Plugins
Adobe Commerce
Overview
Adobe Commerce is a flexible and scalable commerce platform that lets you create uniquely personalized B2B and B2C experiences, no matter how many brands you have.
What is the VodaPay Adobe Commerce plugin?
The VodaPay extension (plugin) integrates with Adobe Commerce to provide a secure payment solution, that accepts credit and debit cards payments. The VodaPay Adobe Commerce plugin is powered by the VodaPay Gateway to provide a simple and easy-to-implement eCommerce solution for your web-site.
How do I add the VodaPay Adobe Commerce plugin to Adobe Commerce?
- Obtain a copy of the latest plugin distributable.
- Install the plugin on your Adobe Commerce site.
Obtaining a copy
The latest VodaPay Gateway for Adobe Commerce plugin must be downloaded from the GitLab Releases resource site here.
Installation
Installation
Install using Composer (recommended)
From the Magento root directory, install the VodaPay module using composer require vodapay/vodapay.
Install using FTP/SFTP
- Download magento-plugin-1.1.7.zip and unzip it to a directory on your local machine.
- Use an FTP tool (such as FileZilla) to upload the contents of magento-plugin-1.1.7 directory to the app\code\VodaPay\VodaPay\ directory of your Magento installation.
- From the Magento root directory, install VodaPay dependencies using composer require ngenius/ngenius-common:v1.1.0.
- Perform the following commands to build and install the payment plug-in.
php bin/magento module:enable VodaPay_VodaPay
php bin/magento setup:upgrade
php bin/magento setup:di:compile
php bin/magento indexer:reindex
php bin/magento cache:clean
Configuring the plugin
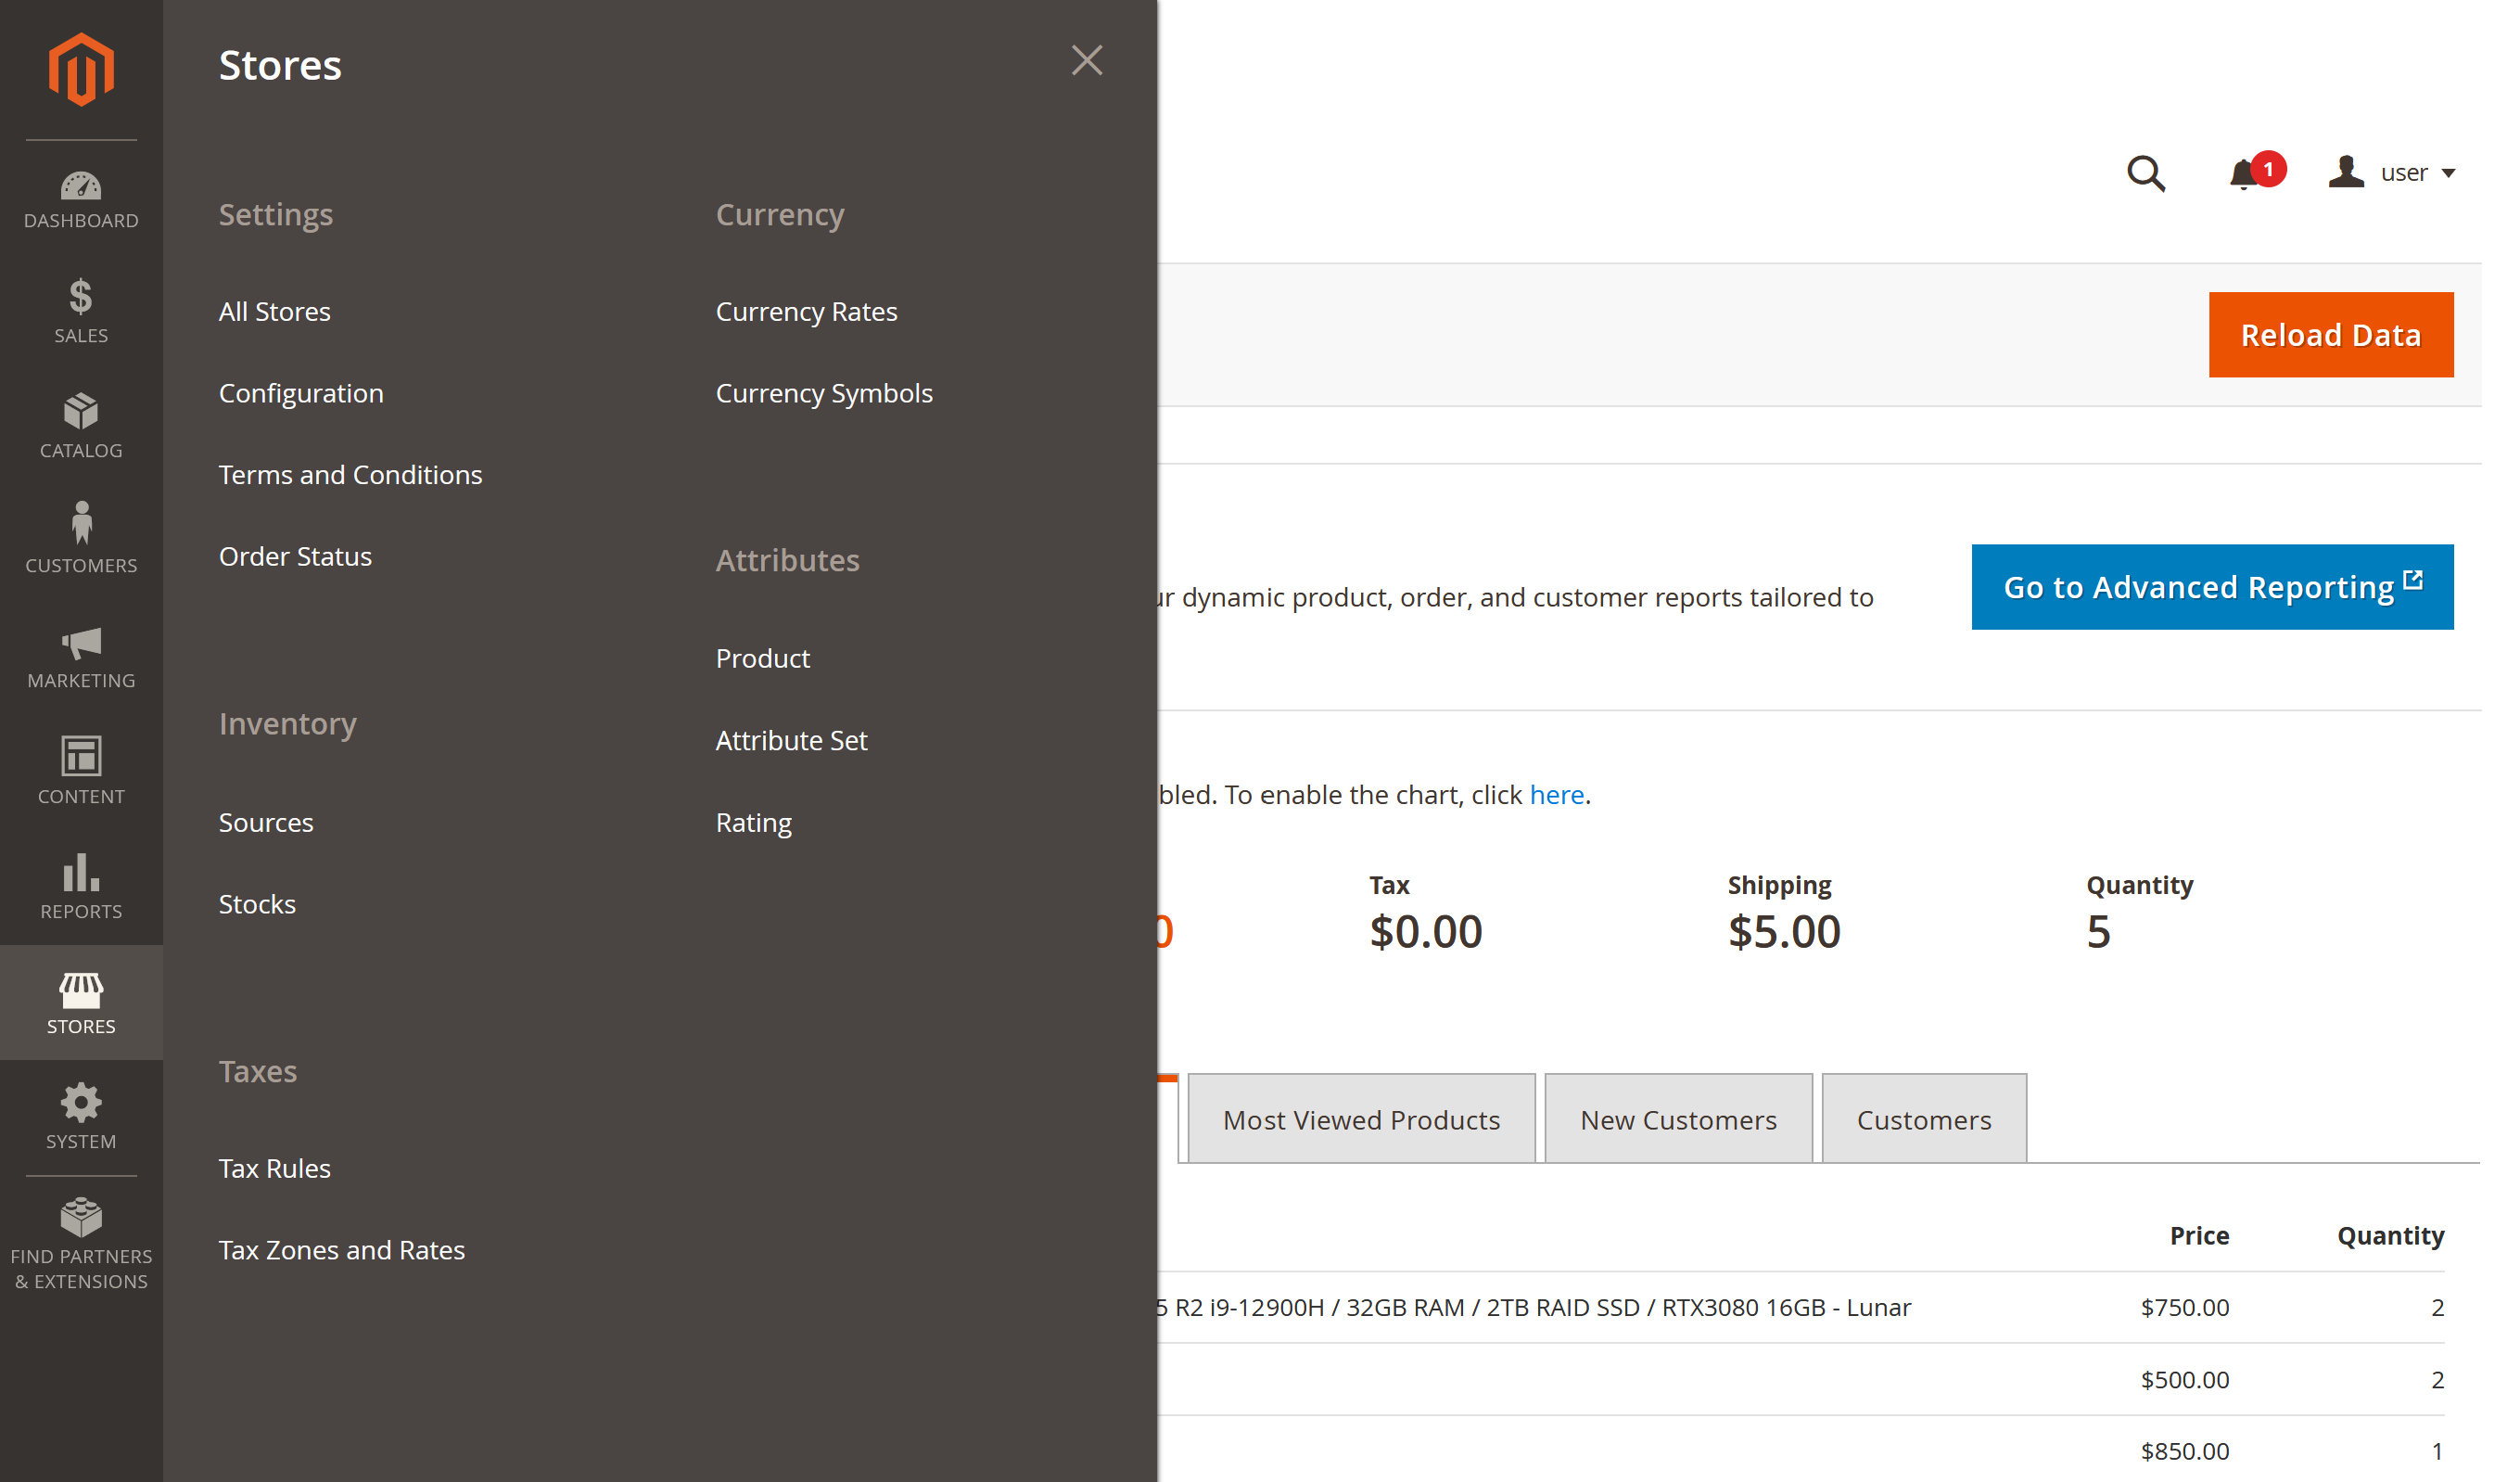
- In the admin portal of the store click on the Stores followed by the Configuration option.
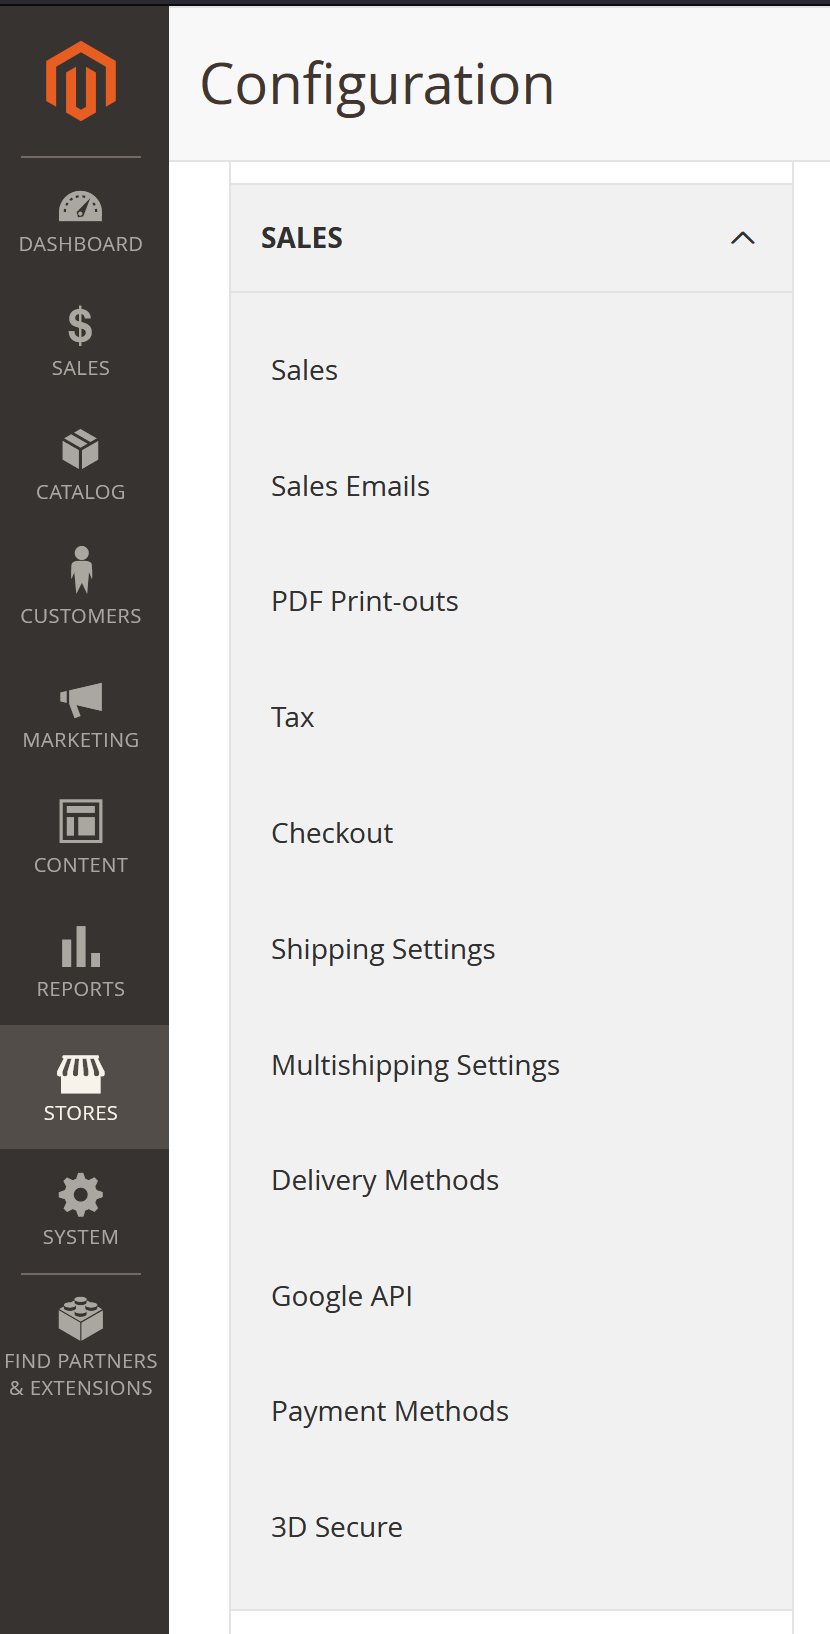
- Click on the Sales followed by the Payment Methods option.
- Scroll down to Other Payment Methods where you will be able to configure various settings for the plugin.
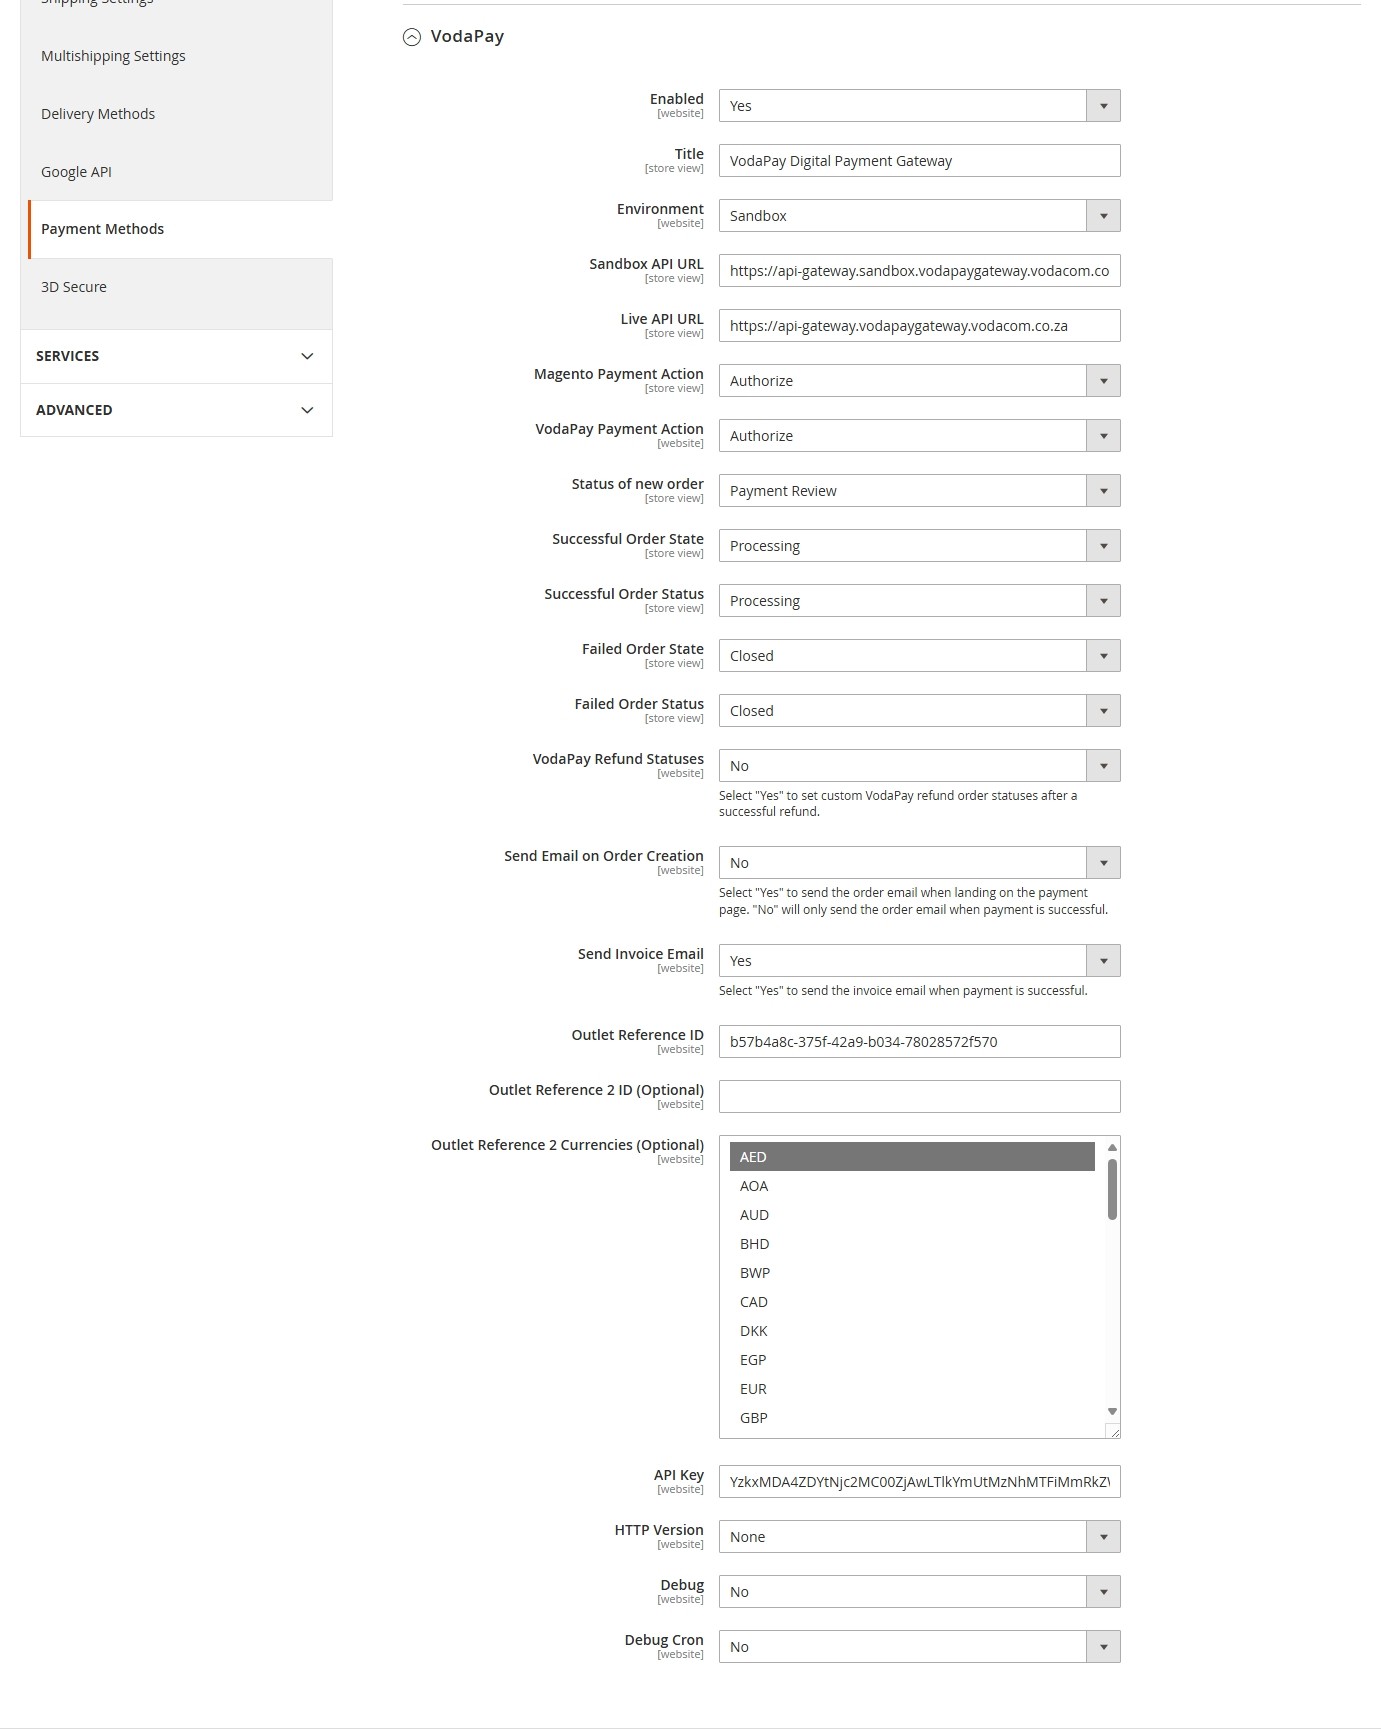
| Field | Description |
|---|---|
| Enabled | Enabled Mode can be set to Yes or No to enable or disable the plugin as a payment option on your check-out page |
| Title | You can customize the title seen on the payment page when a customer selects the payment method |
| Environment | Select environment (Sandbox or Live) |
| Sandbox API URL | Default URLs pre-loaded. For Partners - Enter URLs provided by the Bank |
| Live API URL | Default URLs pre-loaded. For Partners - Enter URLs provided by the Bank |
| Status of new order | Select the status you'd like for new orders |
| Successful Order Status | Select the order status for successful orders |
| Failed Order Status | Select the order status for failed orders |
| Refund Statuses | Select "Yes" to set custom refund order statuses after a successful refund |
| Send Email on Order Creation | Select "Yes" to send the order email when landing on the payment page. "No" will only send the order email when payment is successful |
| Send Invoice Email | Select "Yes" to send the invoice email when payment is successful |
| Payment Action | Select the Payment Action option you want |
| Set successful orders to 'Processing' | Check this box if you want successful orders to be set to 'Processing' status automatically |
| Outlet Reference ID | Enter Outlet Reference found in Merchant Portal under the My Profile - eCommerce tab |
| Outlet Reference 2 ID (Optional) | The Outlet ID for additional currencies |
| Outlet Reference 2 Currencies (Optional) | For merchants who have signed up for more than one currency. Limited to 3 currencies |
| API Key | Enter the Plugin Key found in Merchant Portal under the My Profile - eCommerce tab. This is different from the Payment Gateway API Key used for eCommerce API integration |
| Http Version | Select the Http version 2 TLS |
| Debug | Debug mode allows the plugin to record all logs in the case of an investigation into a bug. It can greatly impact the loading speed of the pages of the store so it is recommended that it be left off until necessary |
| Debug Cron | Leave the Cron Debug Mode option as No, unless instructed to turn it on by the VodaPay Integration team |
Once-Off Journey
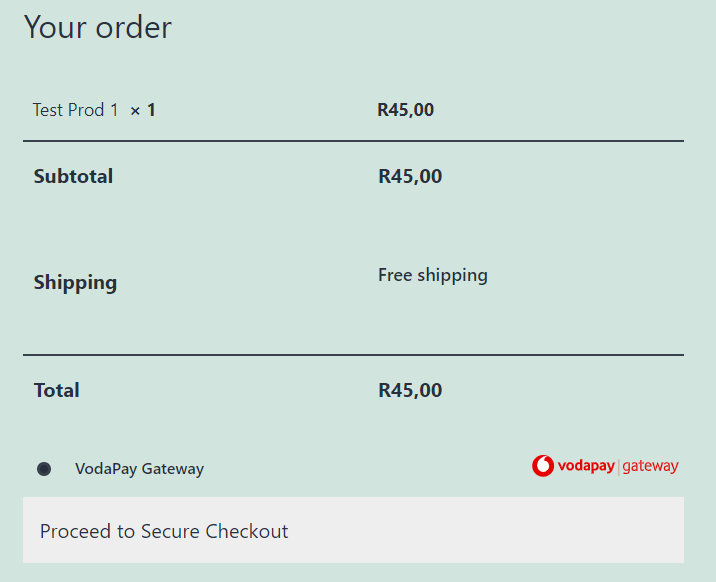
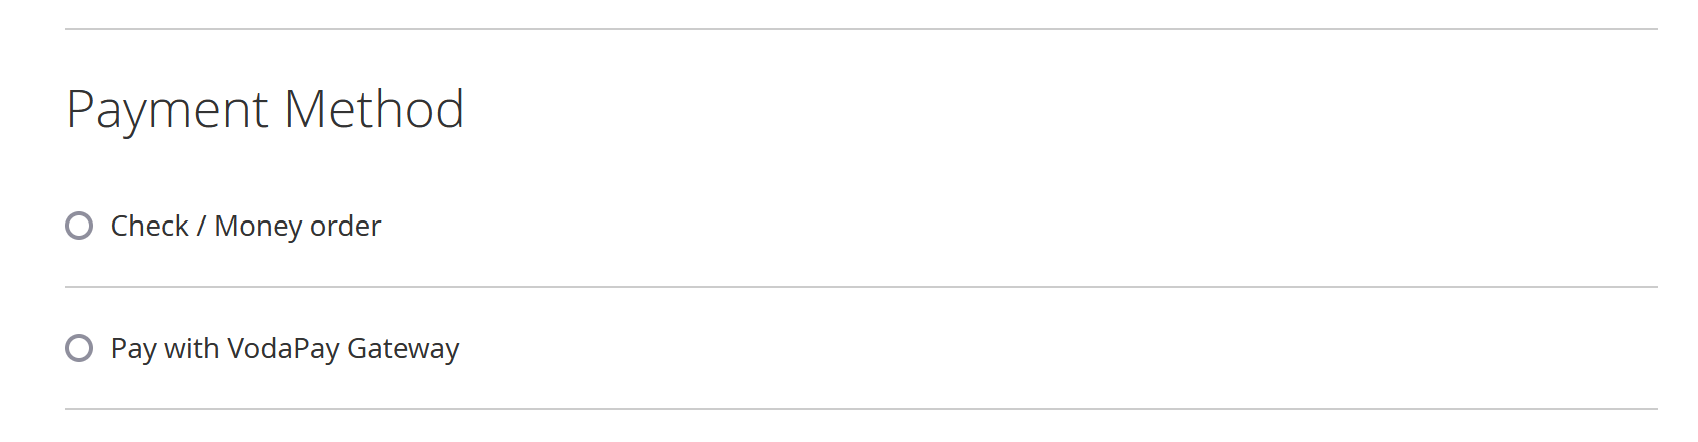
Once all the installation steps have been followed, VodaPay Gateway should show up as a payment option on checkout.
Refund Journey
Process a Refund
Please ensure that the Environment and API-Key are the same as what the order was processed with before proceeding.
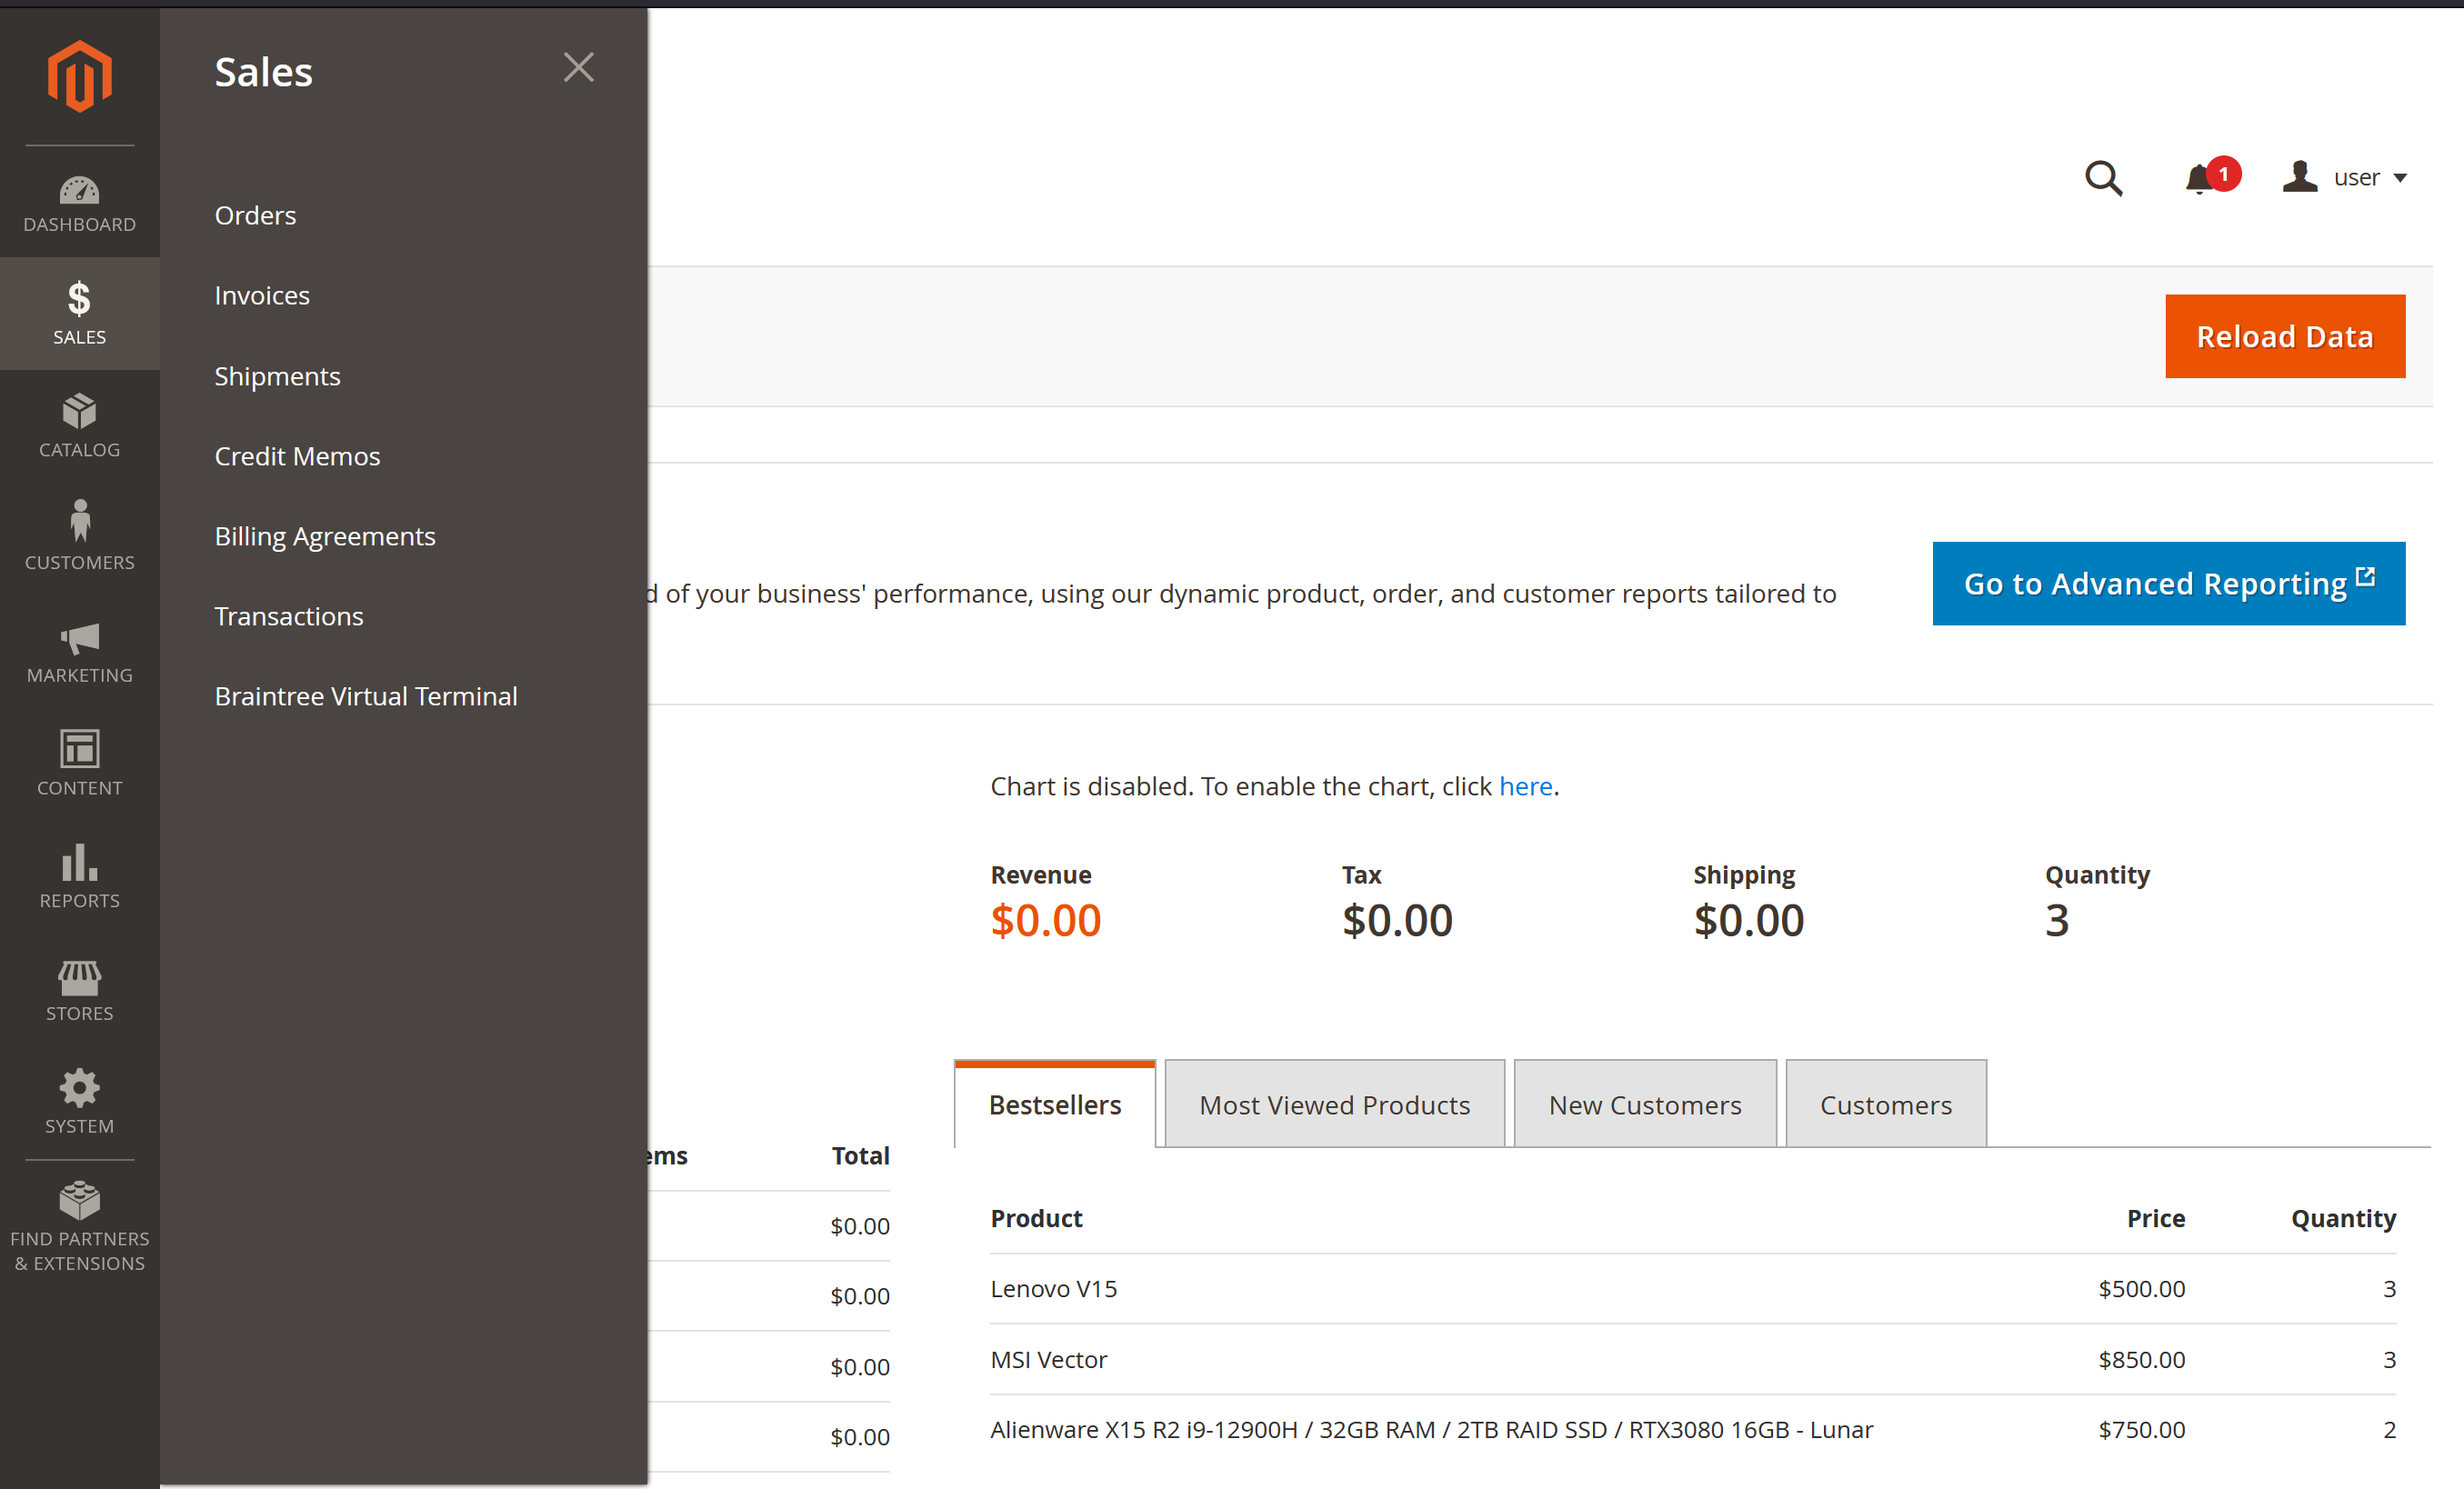
- In the Magento admin dashboard click on Sales and then Orders.
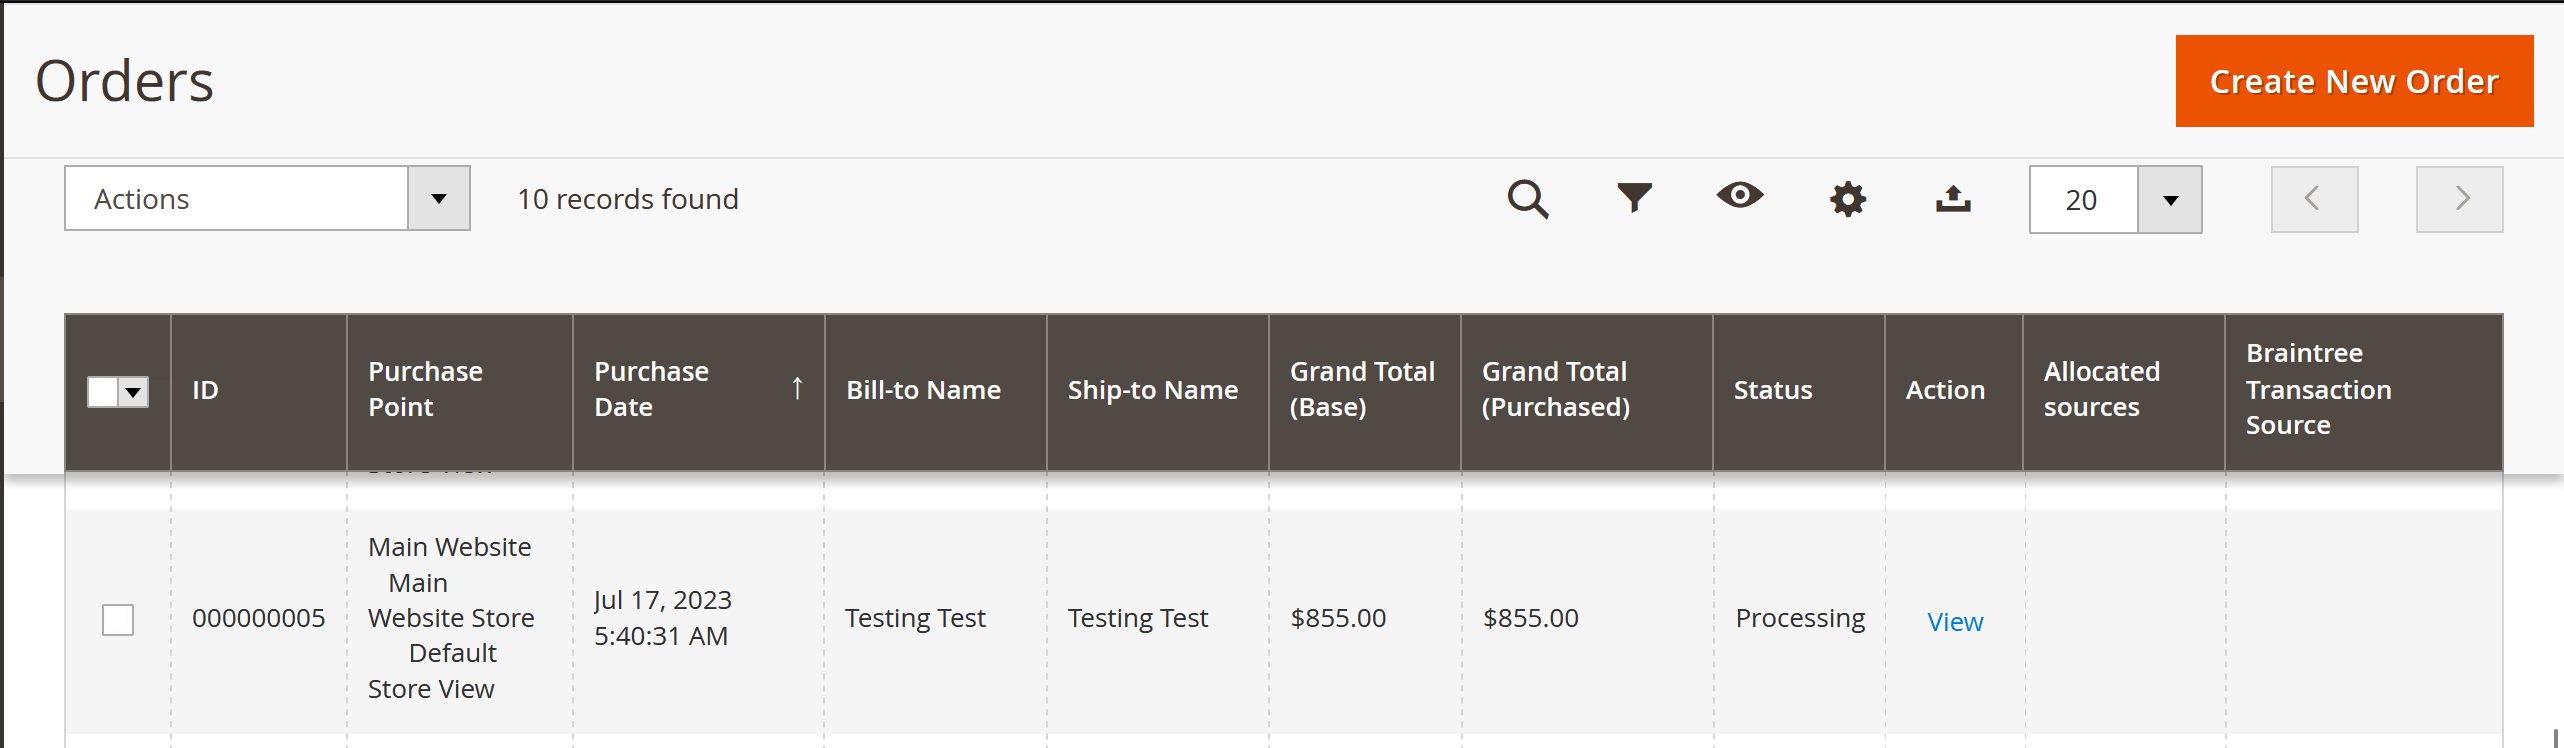
- Navigate to the order that needs a refund. Click "View" on the Order you would like to Refund.
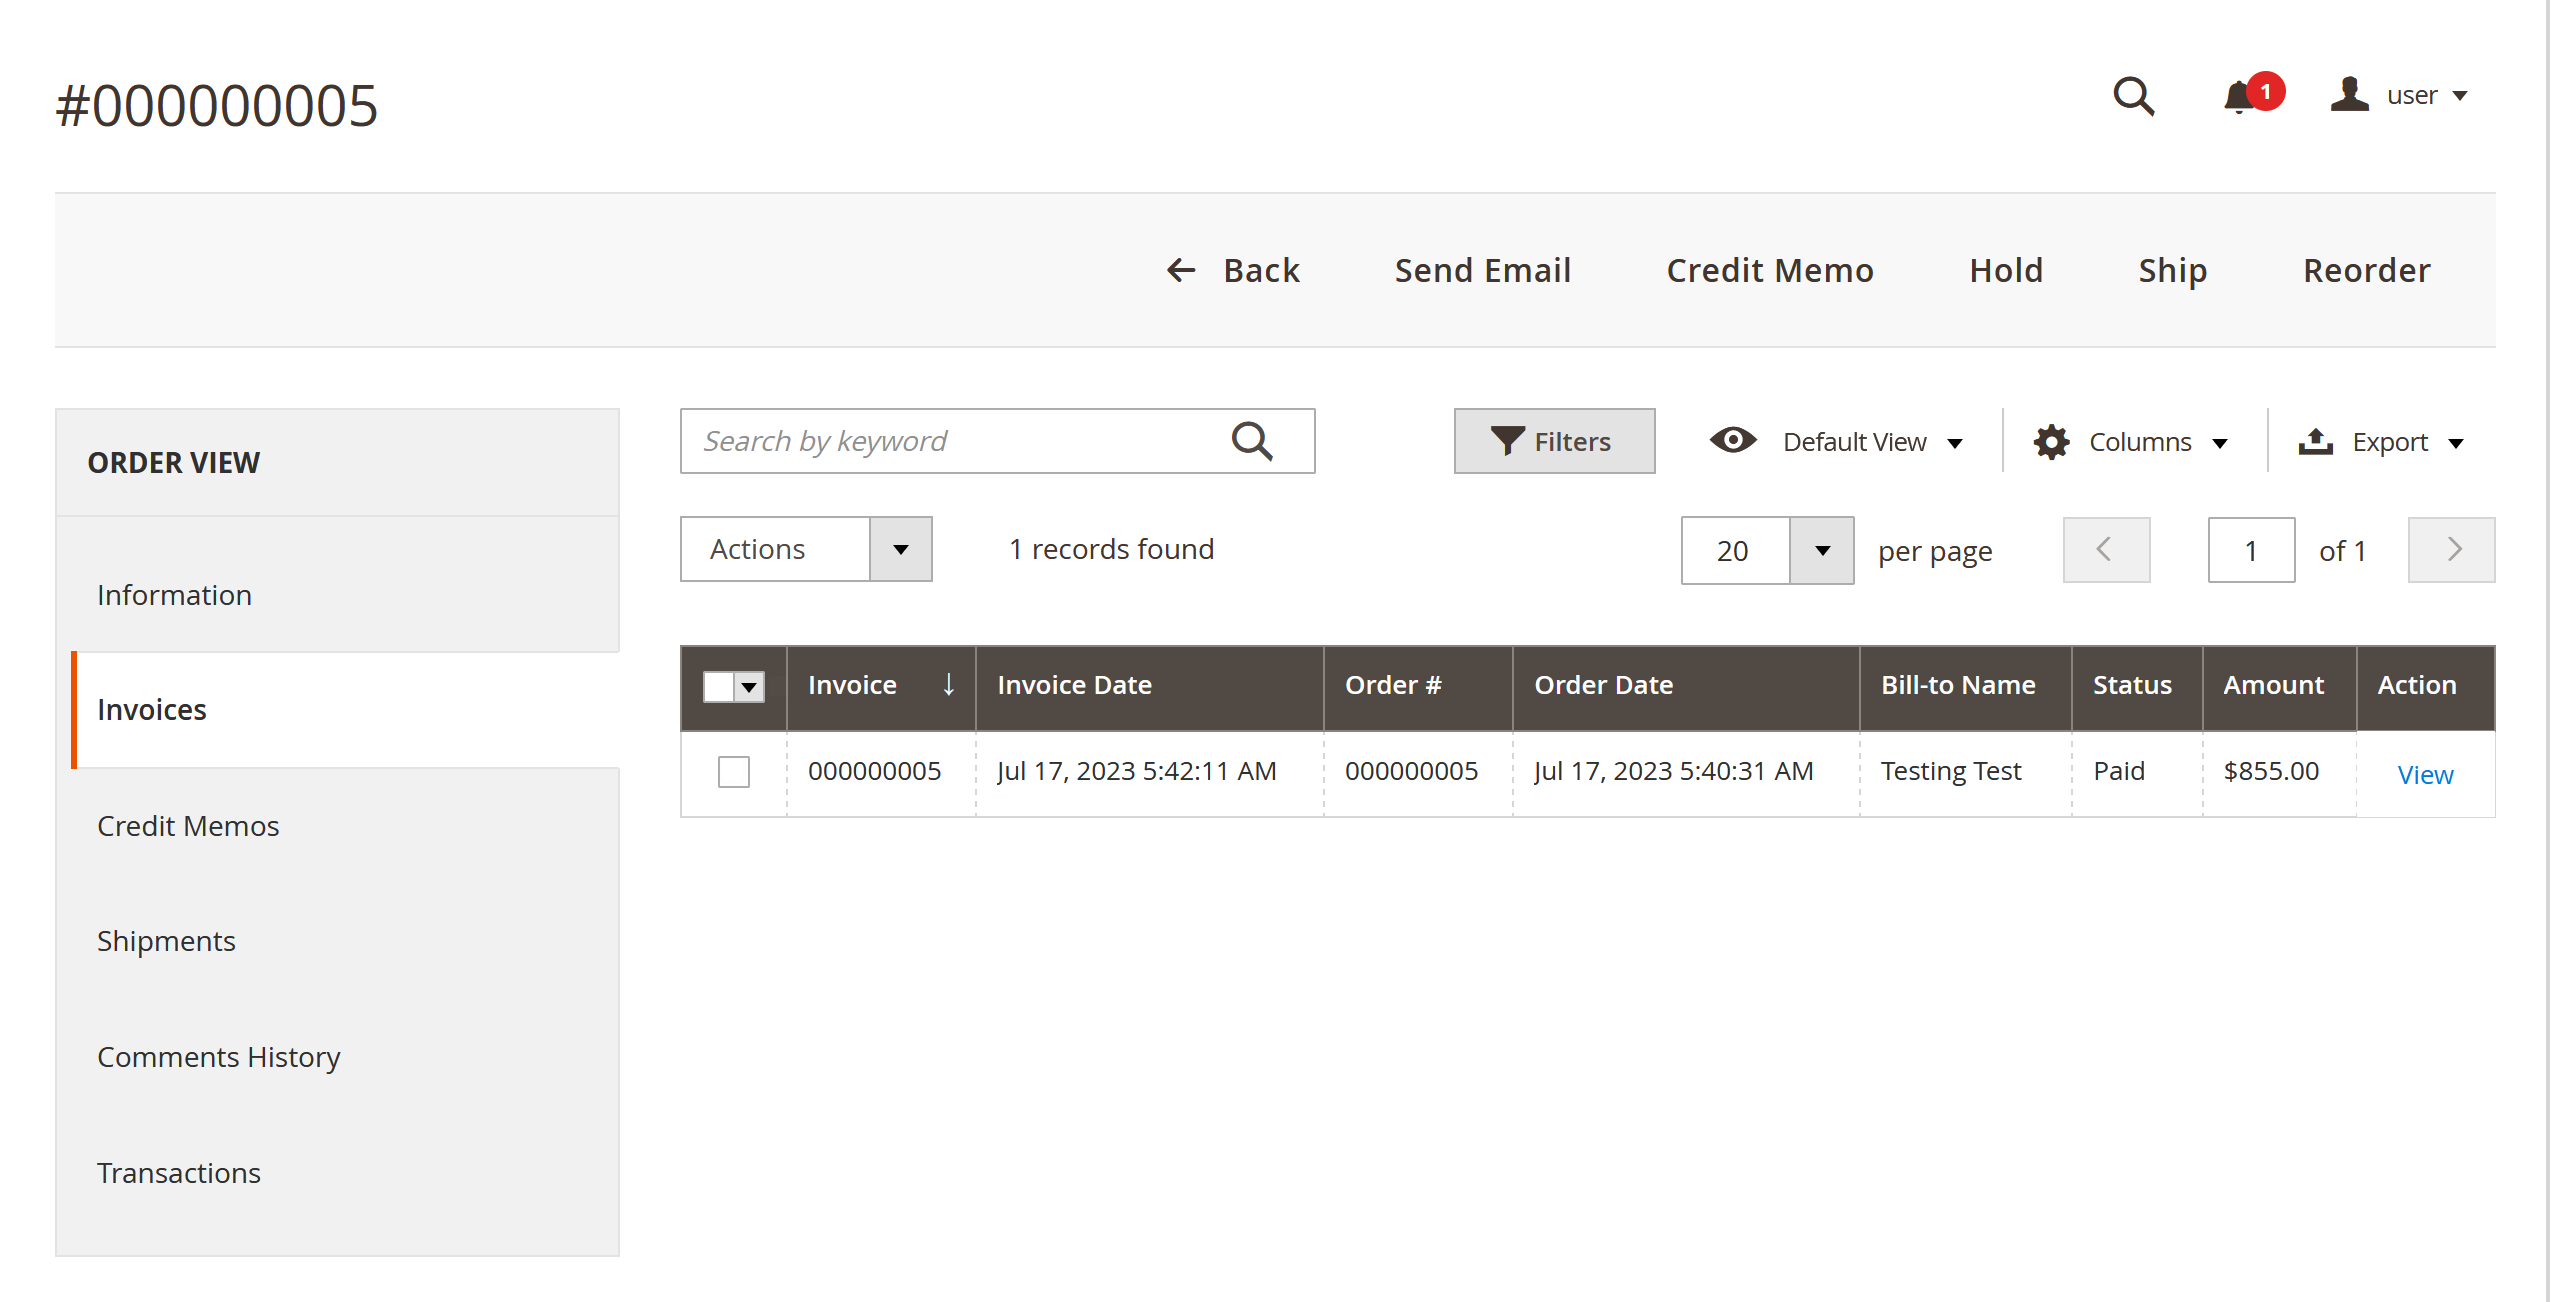
- Click Invoices to go the Invoices Page then you choose the invoice that needs a refund.
- You will now be on the Invoice Details Page. Click on Credit Memo.
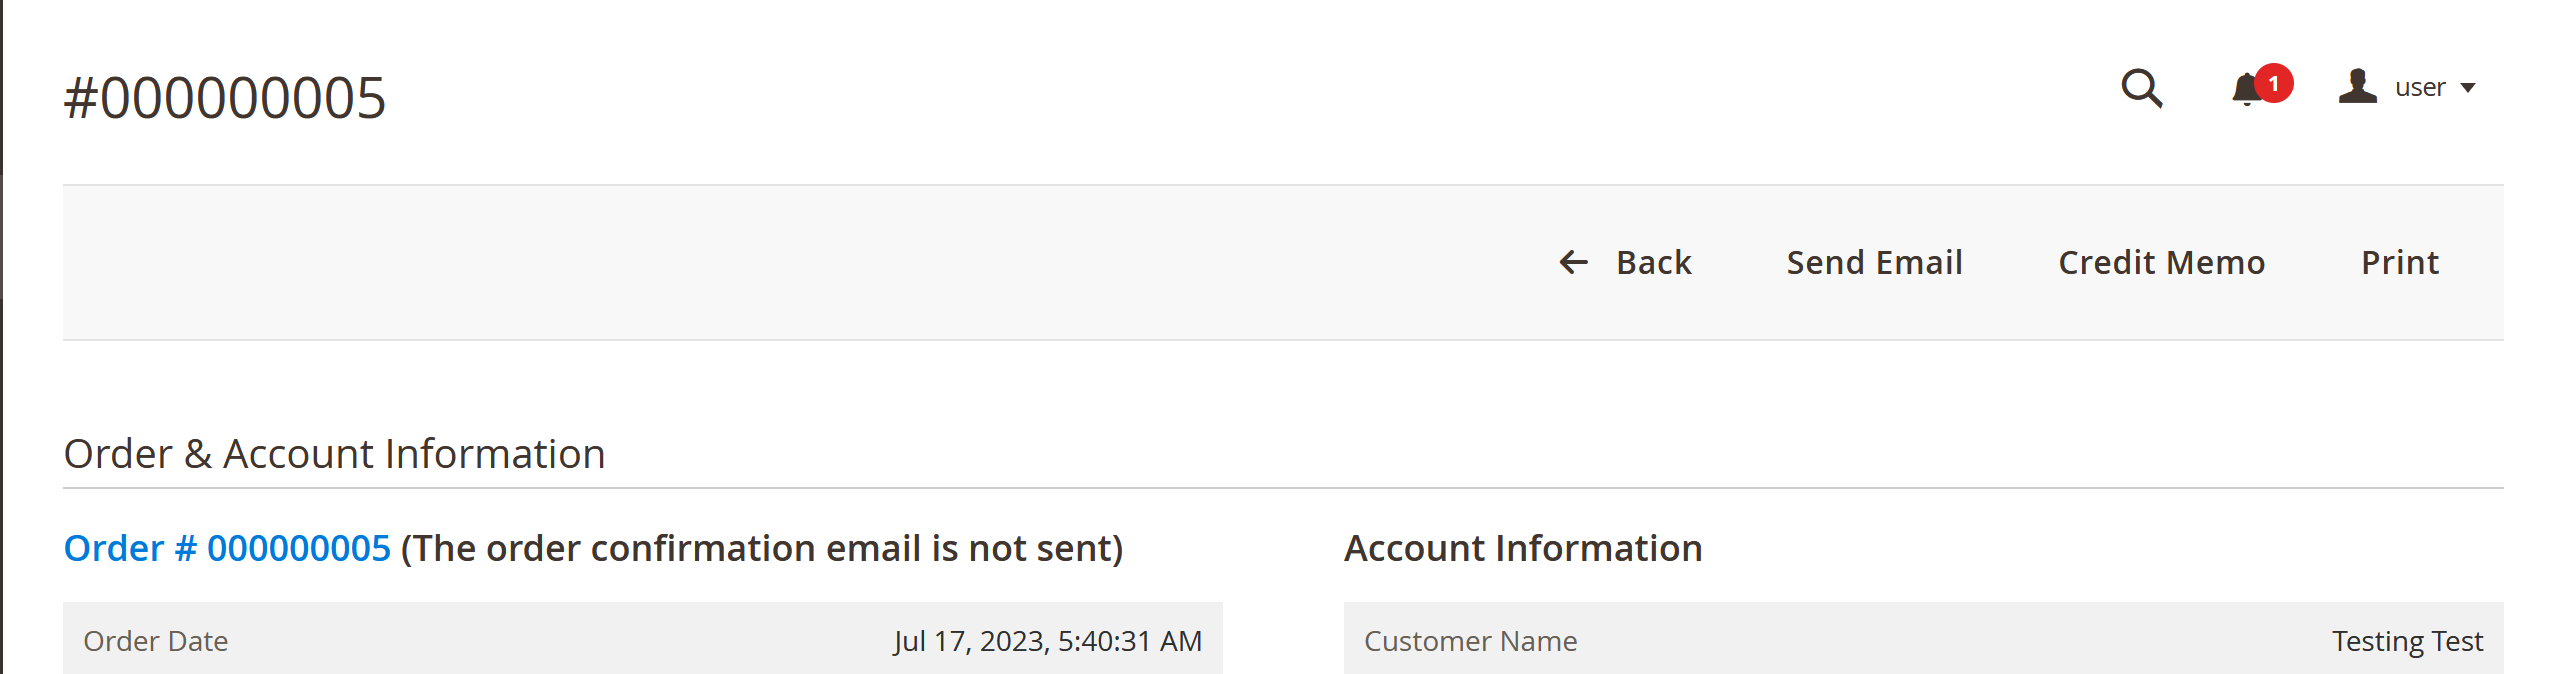
- You will be on the New Memo page, where you will fill out your refund option: refunding individual items, refunding shipping, refunding amount and refunding fee. As well as the amounts for the options you have selected. Finally you will click Refund.
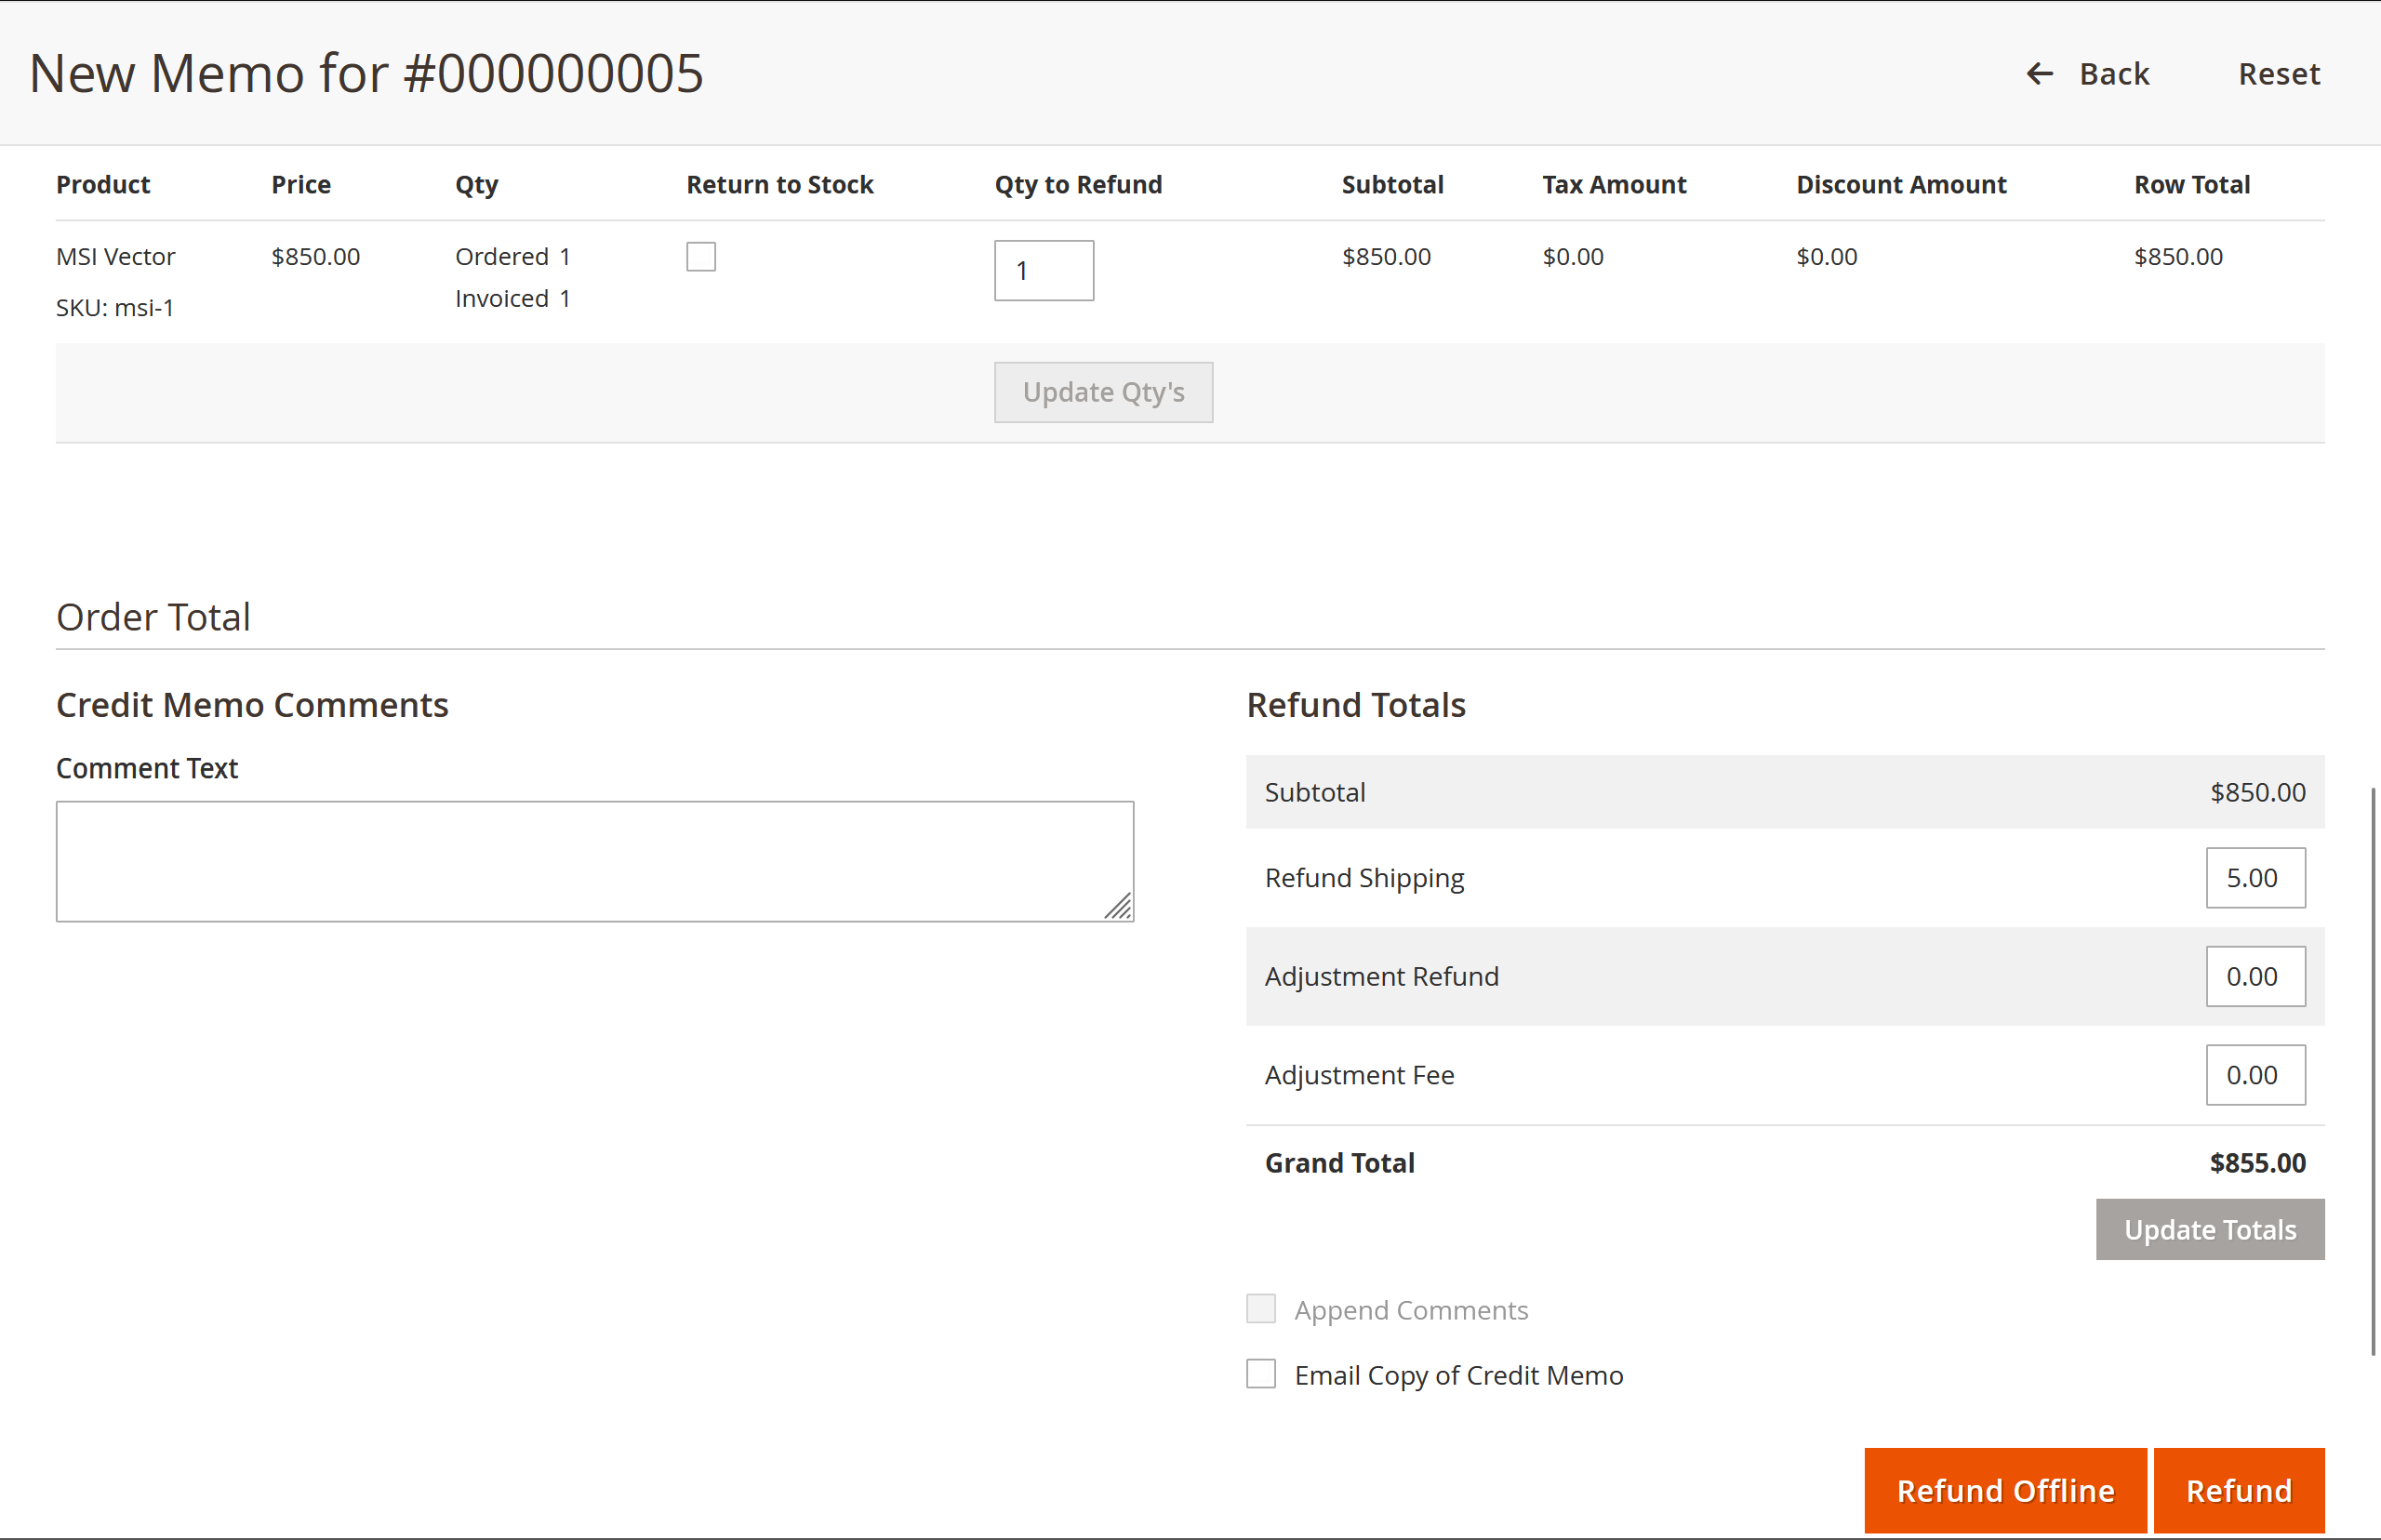
Credit Memo
If the process was successful a new Credit Memo will be created and the refund will be processed through the VodaPay Gateway.
OpenCart
Overview
OpenCart is a free open-source e-commerce platform for online merchants. OpenCart provides a professional and reliable foundation from which to build a successful online store. This plugin only supports OpenCart 4.
What is the VodaPay OpenCart plugin?
The VodaPay extension (plugin) integrates with OpenCart to provide a secure payment solution, that accepts credit and debit cards payments. The VodaPay OpenCart plugin is powered by the VodaPay Gateway to provide a simple and easy-to-implement eCommerce solution for your web-site.
How do I add the VodaPay OpenCart plugin to OpenCart?
- Obtain a copy of the latest plugin distributable.
- Install the plugin on your OpenCart site.
Obtaining a copy
The latest VodaPay Gateway for OpenCart plugin must be downloaded from the GitLab Releases resource site here.
Installation
Installing OpenCart
Installing OpenCart
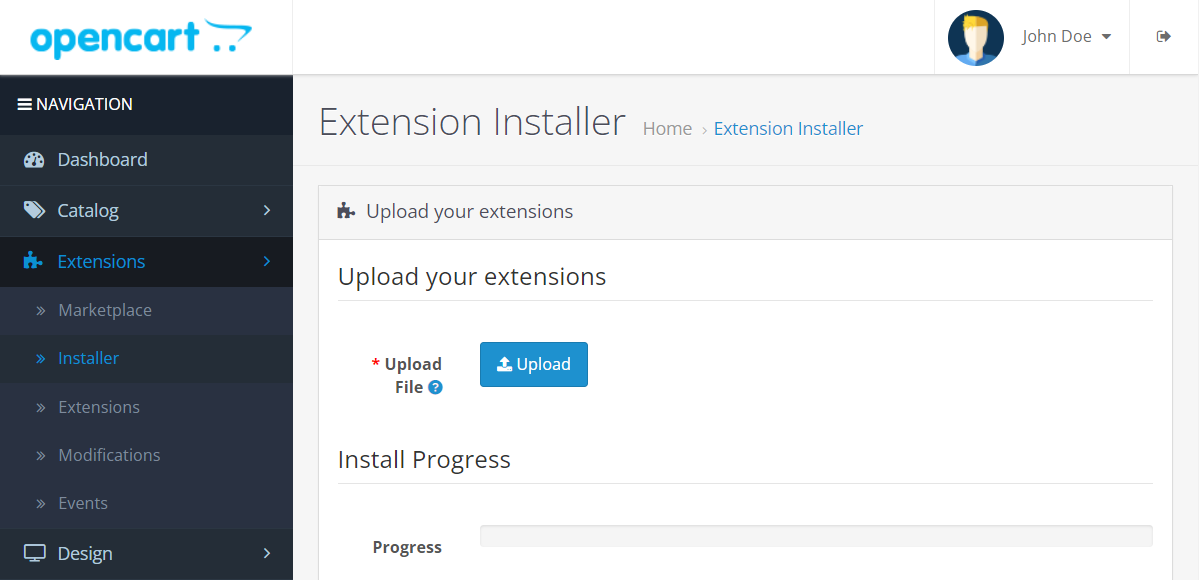
- Select Extensions, followed by Installer from the menu.
- Click the blue Upload button; and upload
vodapay-gateway.ocmod.zip.
- Select Extensions, followed by Extensions, and then filter by Payments.
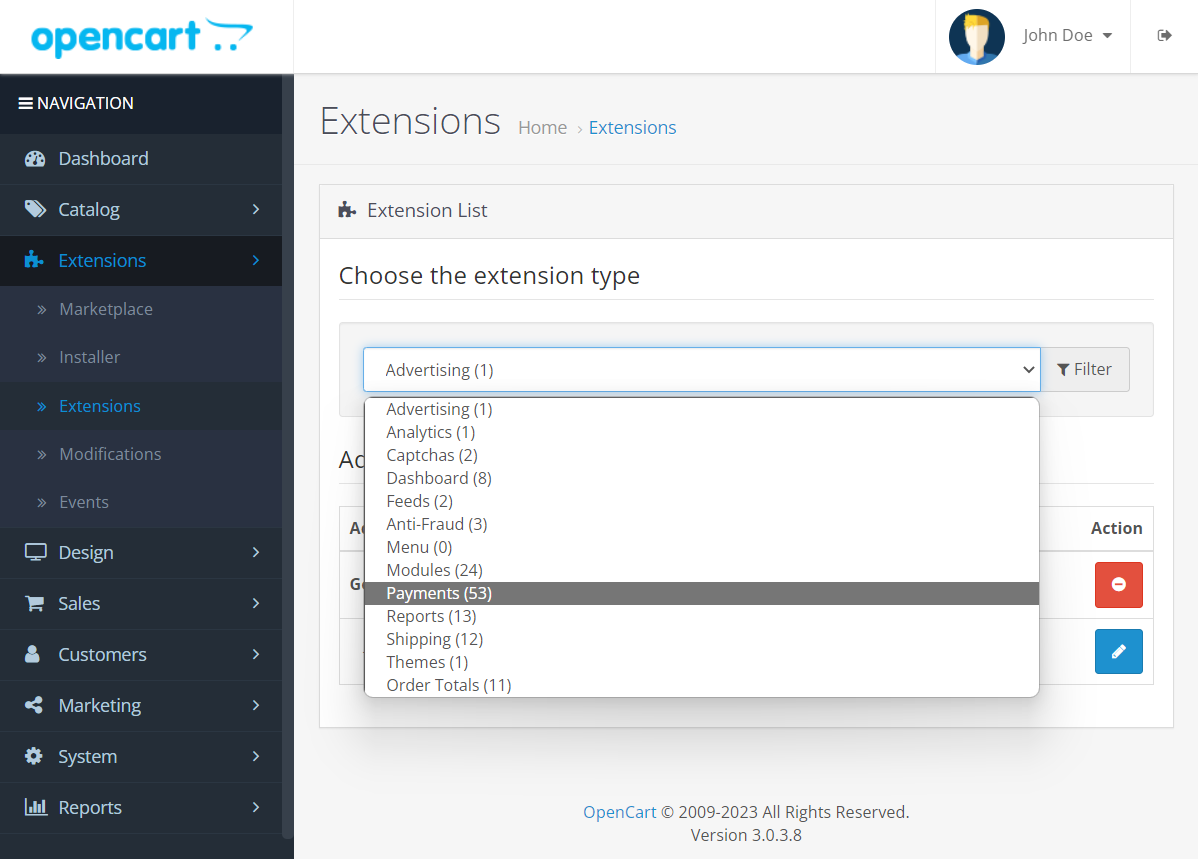
- Find VodaPay Gateway in the list and press the green plus button to install the extension.

Configuring the plugin
- Select Extensions, followed by Extensions, and then filter by Payments.
.png)
- Find VodaPay Gateway in the list and press the blue pencil button to configure the extension.
- You should now see the settings that are configurable for the OpenCart plugin
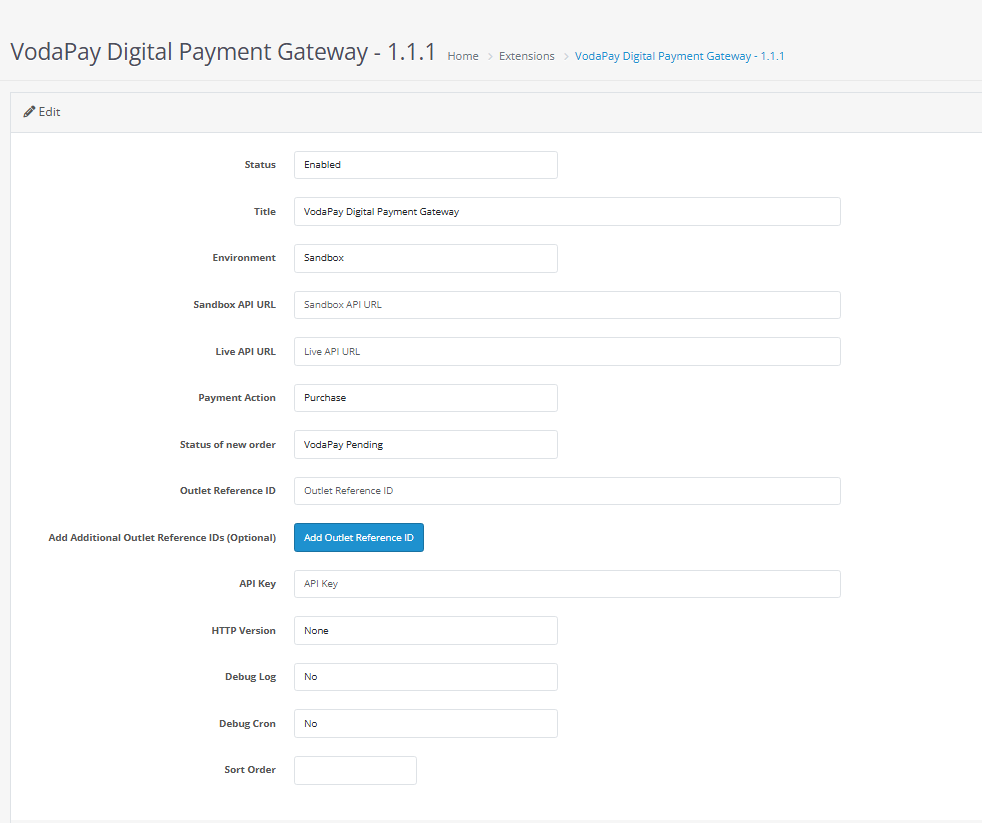
| Field | Description |
|---|---|
| Status | Status can be set to Enabled or Disabled to control whether the plugin is available as a payment option on your checkout page. |
| Title | The text that will be displayed on the front-end for this payment method. |
| Environment | Select environment (Sandbox or Live) |
| Sandbox API URL | Enter Sandbox API URL https://api-gateway.sandbox.vodapaygateway.vodacom.co.za |
| Live API URL | Enter Live API URL https://api-gateway.vodapaygateway.vodacom.co.za |
| Payment Action | Select the required action: Authorize, Sale, or Purchase. |
| Sandbox/Live API URL | Default URLs are pre-loaded. For partners, enter the URLs provided by the bank. |
| Outlet Reference ID | Provided by NI or your partner. Ensure the currency and ID match the selected environment. |
| Add Additional Outlet Reference IDs | Additional currencies can be configured if provided by NI or the bank. |
| API Key | The API-Key is your secure identifier as a merchant. Different keys are provided for Sandbox and Live environments. Always configure the correct key for the environment you are using. |
| HTTP Version | Select the HTTP version supported by the server. |
| Debug Log | Leave the Debug mode option off, unless instructed to turn it on by the VodaPay Integration team. |
| Debug Cron | Leave the Debug Cron option off, unless instructed to turn it on by the VodaPay Integration team. |
Other required configuration
South African rands must be an available currency
VodaPay Gateway only supports transactions in South African Rands. The VodaPay Gateway will remain unavailable as a payment option unless South African Rands are the selected currency.
- Select System, followed by Localisation, and then Currencies.

- Click the blue plus and fill in the following settings for South African Rands.
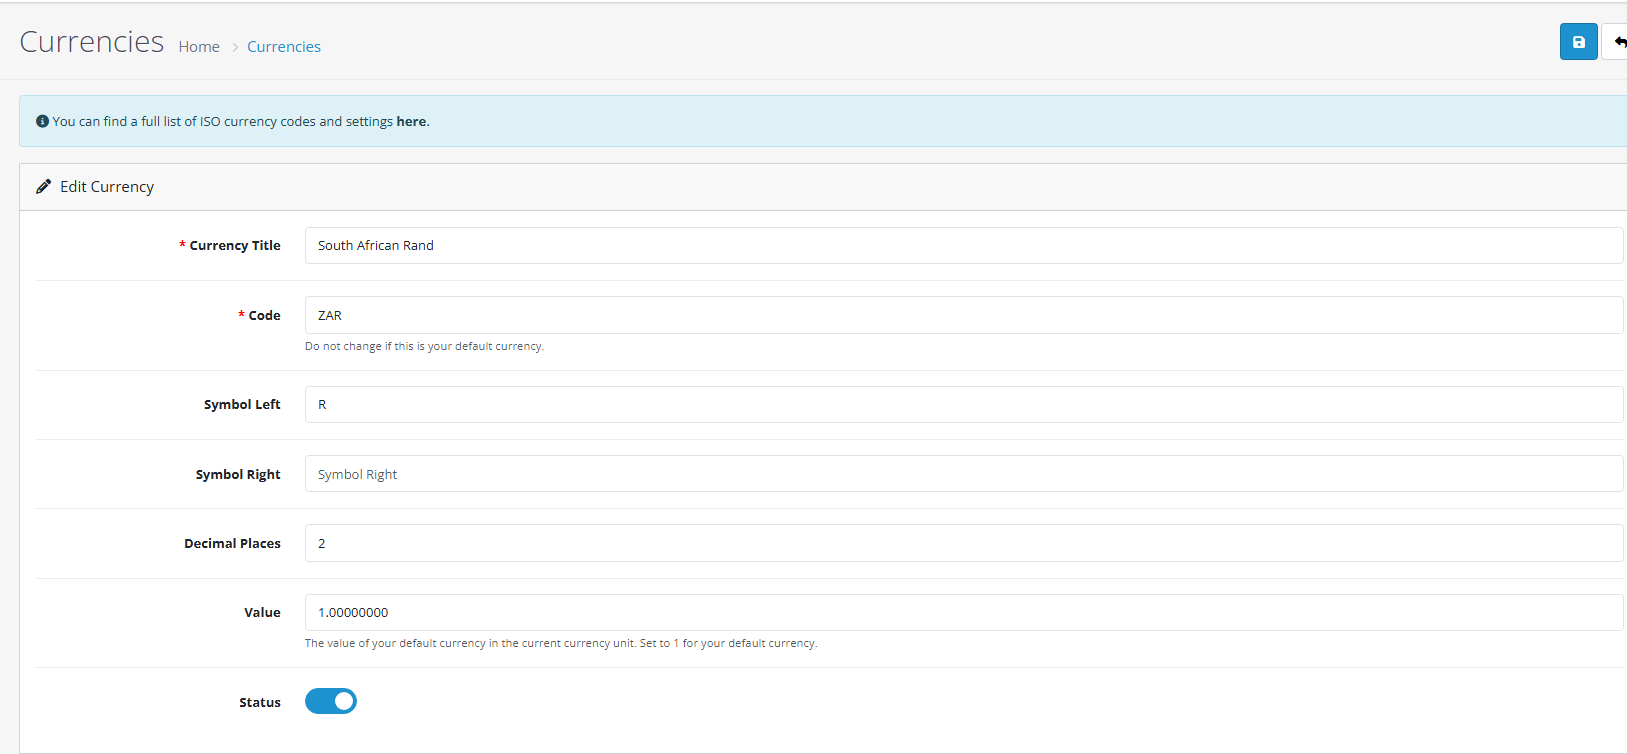
- The following screenshot shows a list after adding South African Rands.
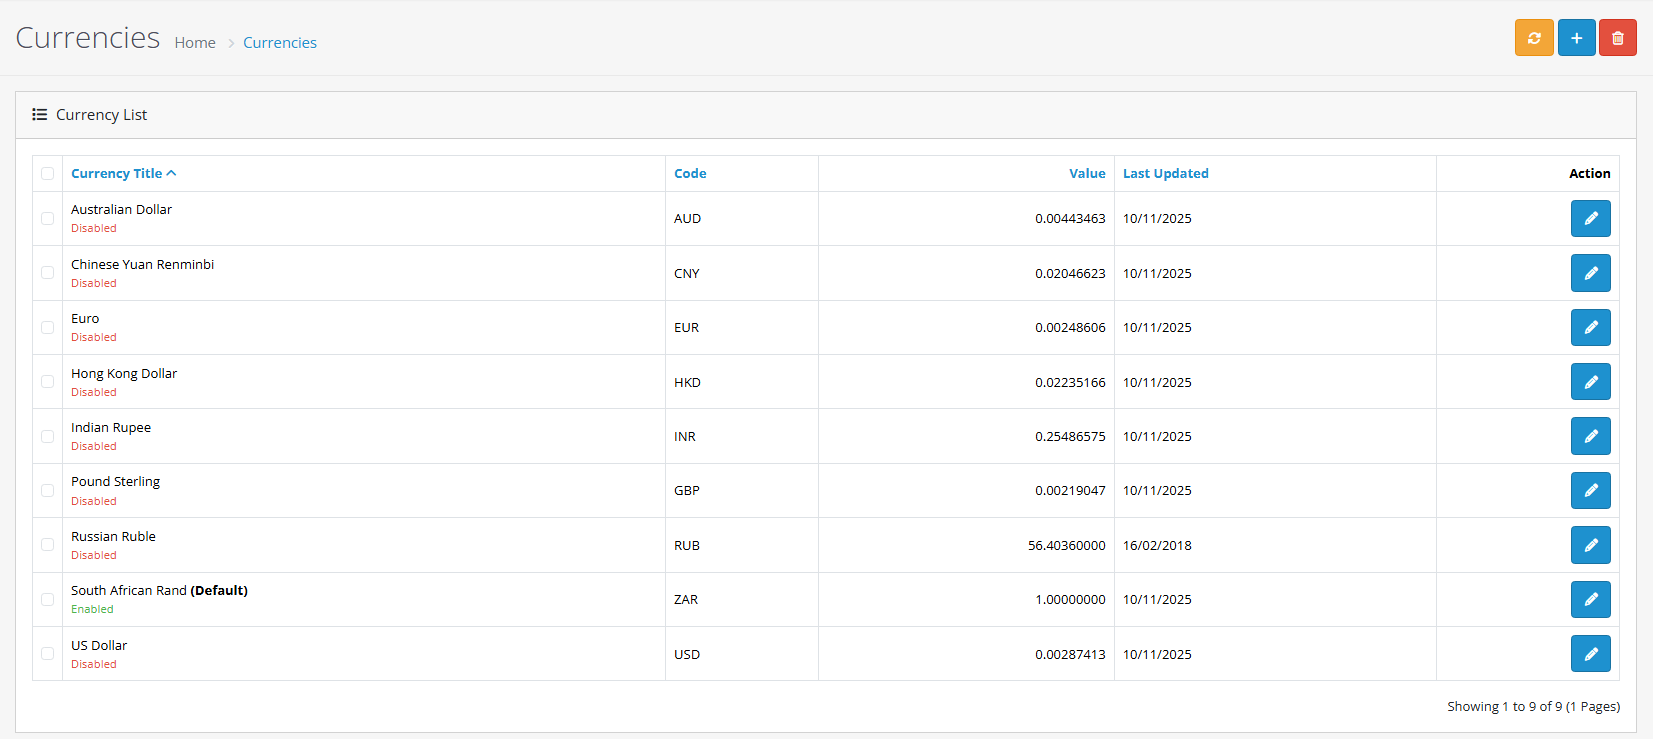
VAT
In order for VAT to be correctly presented on the checkout page, you must configure VAT in OpenCart.
Select System, followed by Localisation and then Taxes, and finally Tax Rates.

Click the blue plus and fill in the following settings for South African VAT.
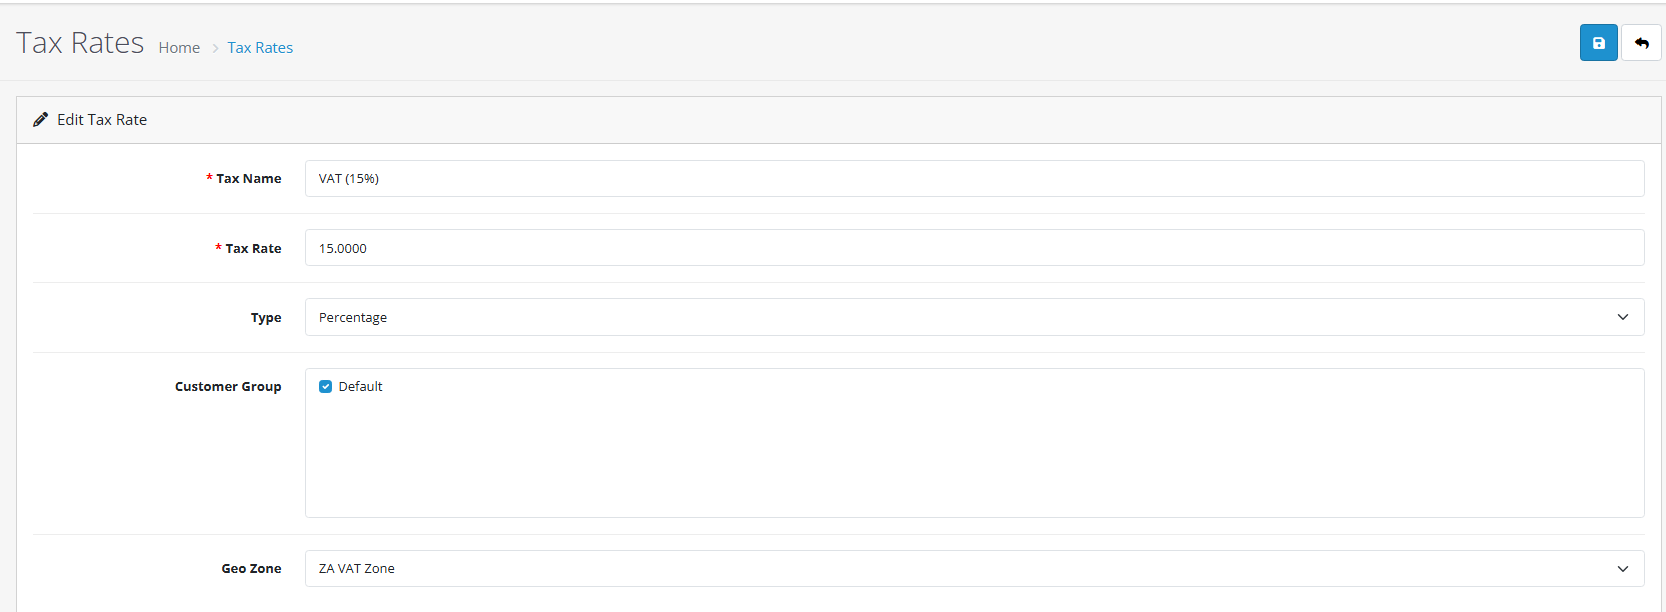
The following screenshot shows a list after adding South African VAT.

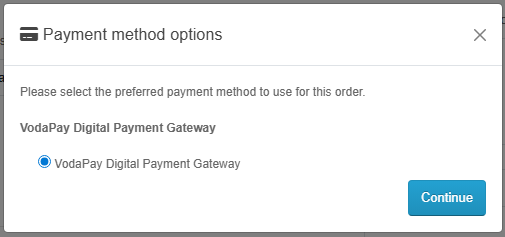
Once-Off Journey
Once all the installation steps have been followed, VodaPay Gateway should show up as a payment option on checkout.
Refund Journey
Process a Refund
Please ensure that the Environment and API-Key are the same as what the order was processed with before proceeding.
- Open your OpenCart Store's admin dashboard.
- Navigate to Sales -> Orders.
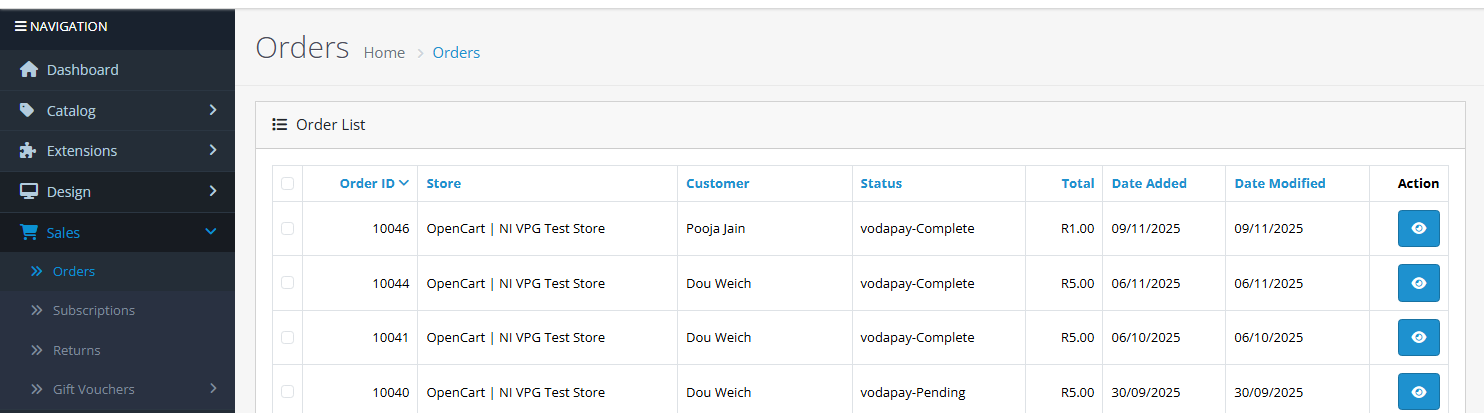
- Click the blue view button labeled "View" of the Order you would like to Refund.

- Scroll down until you see Order History and then press on the VodaPay Gateway Refund tab.

- Enter the amount to be refunded and then press the blue "Refund Payment" button.
PLEASE NOTE: The amount entered must be a numeric value above 0 and must not exceed the Amount Paid in Rand.
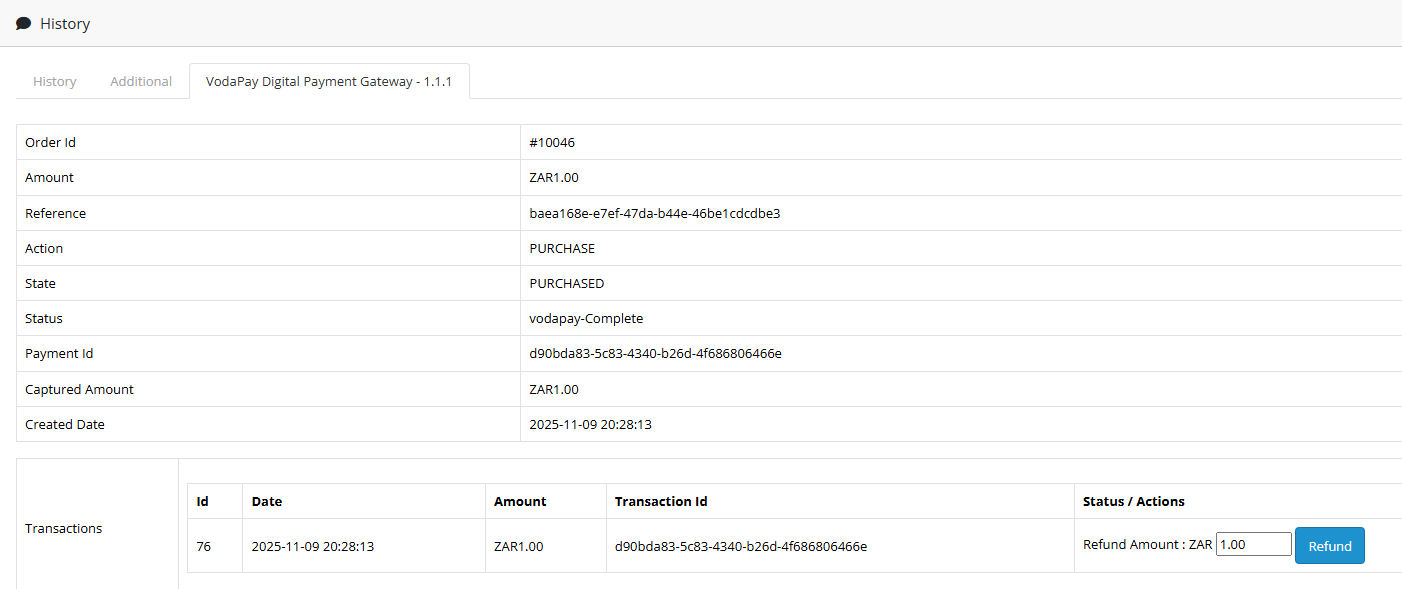
- Finally an alert message will be shown to notify the outcome of the refund.

Credit Memo
If the process was successful a new Credit Memo will be created and the refund will be processed through the VodaPay Gateway.
Successful Refund
If the refund was successful, a comment will be added to notify the amount successfully refunded.

PrestaShop
Overview
PrestaShop is a popular open-source e-commerce platform used by online merchants to create and manage their online stores. It was first launched in 2007 and has since become a reliable and trusted solution for businesses of all sizes. The platform is written in PHP and uses a MySQL database to store product and customer information.
What is the VodaPay PrestaShop plugin?
The VodaPay extension (plugin) integrates with PrestaShop to provide a secure payment solution, that accepts credit and debit cards payments. The VodaPay PrestaShop plugin is powered by the VodaPay Gateway to provide a simple and easy-to-implement eCommerce solution for your web-site.
How do I add the VodaPay PrestaShop plugin to PrestaShop?
- Obtain a copy of the latest plugin distributable.
- Install the plugin on your PrestaShop site.
Obtaining a copy
The latest VodaPay Gateway for PrestaShop plugin must be downloaded from the GitLab Releases resource site here.
Installation
Installation
Please ensure that the Environment and API-Key are the same as what the order was processed with before proceeding.
- Select Modules, followed by Module Manager from the menu under Improve.
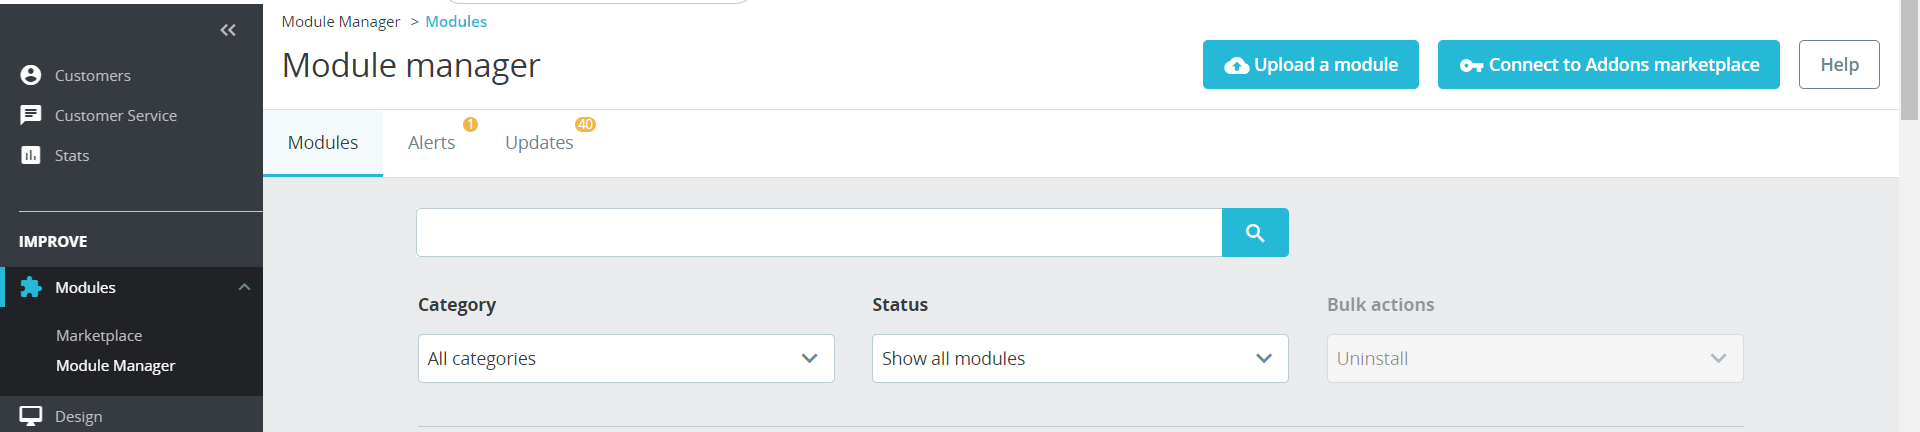
- Click the blue Upload a Module button, and upload
vodapaygatewaypaymentmodule.zip.

If a message Oops... Upload failed. appears, please try again until you achieve the following step.
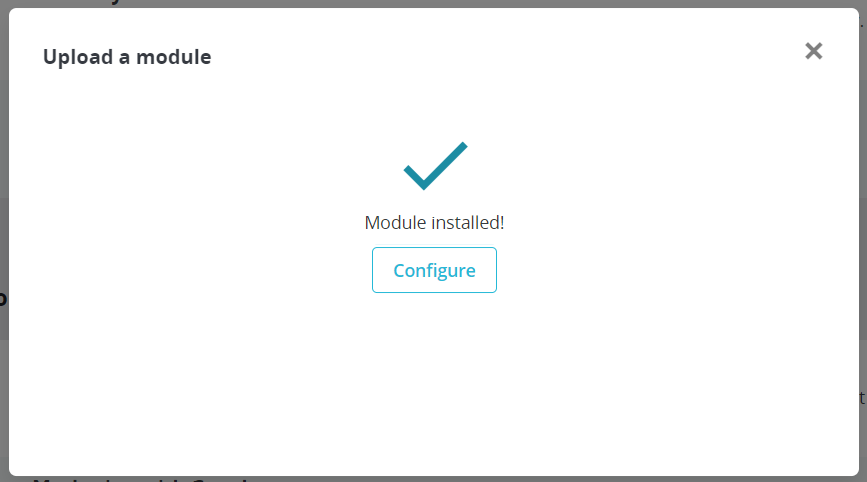
- Upon successfull installation, press the Configure button.
Configuring the plugin
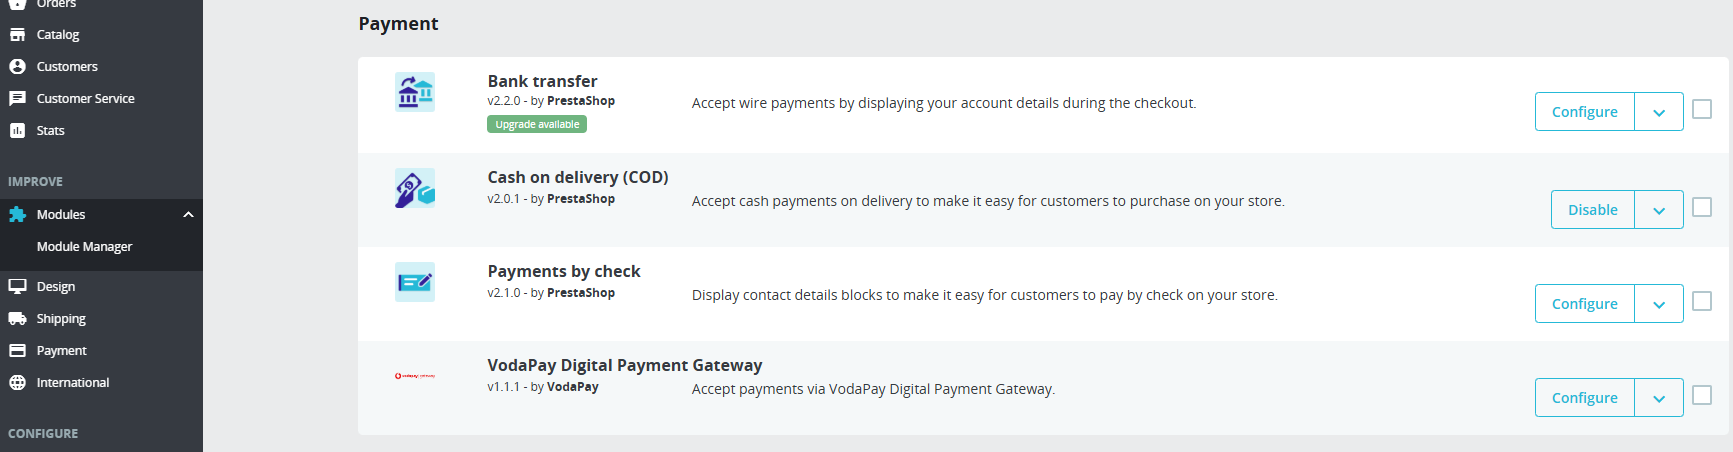
- At Module Manager scroll down until you see VodaPay Digital Payment Gateway and press the Configure button.
- You should now see the settings that are configurable for the PrestaShop plugin.
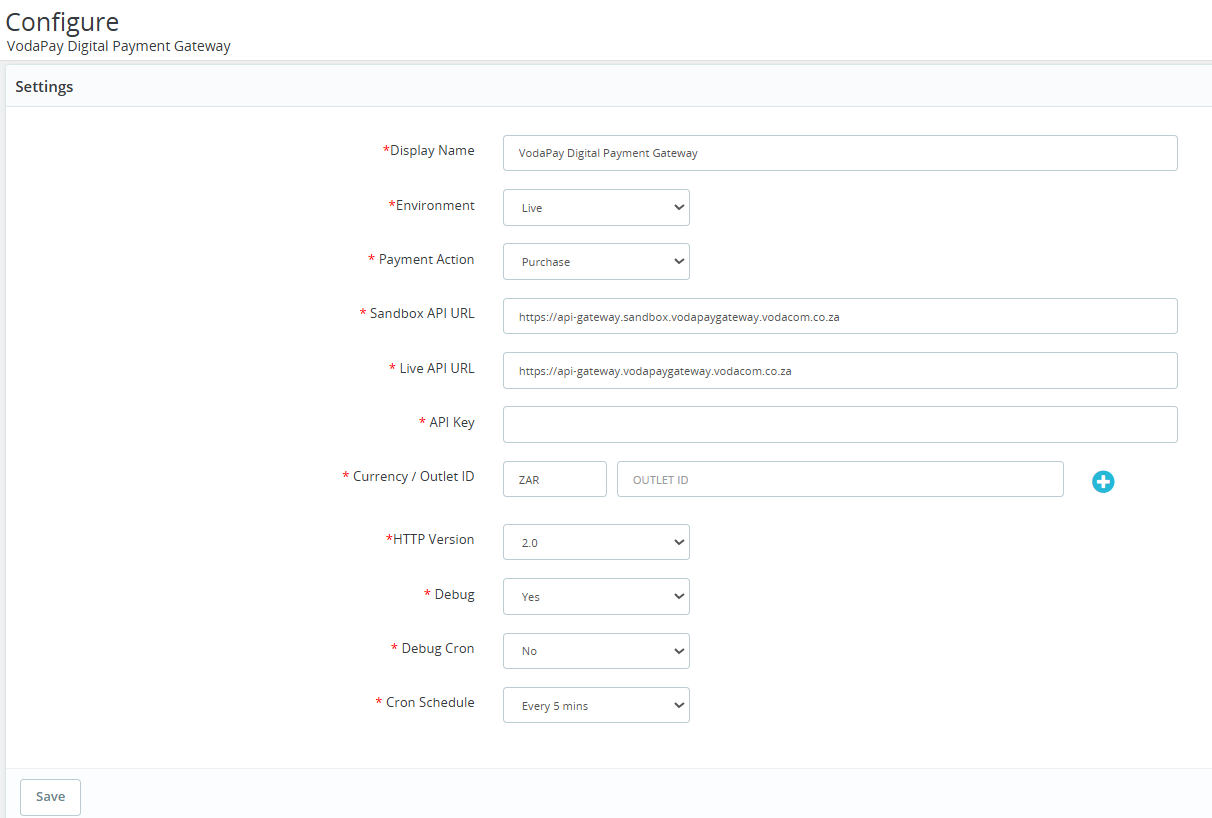
| Field | Description |
|---|---|
| Display Name | Text to display in the front-end |
| Environment | Select environment (Sandbox or Live) |
| Payment Action | Select the Payment Action Purchase |
| Sandbox API URL | Enter Sandbox API URL https://api-gateway.sandbox.vodapaygateway.vodacom.co.za |
| Live API URL | Enter Live API URL https://api-gateway.vodapaygateway.vodacom.co.za |
| API Key | Enter the Plugin Key provided by Merchant Portal. This is different from the Payment Gateway API Key used for eCommerce API integration |
| Currency | Enter Outlet Reference found in Merchant Portal. |
| Outlet Reference | Enter Outlet Reference found in Merchant Portal. |
| Http Version | Select the Http version that your outlet supports. |
| Debug | Leave the Debug option off, unless instructed to turn it on by the VodaPay Integration team. |
| Debug Cron | Leave the Debug Cron option off, unless instructed to turn it on by the VodaPay Integration team. |
| Cron Schedule | Select the preferred time or leave as default. |
Once-Off Journey
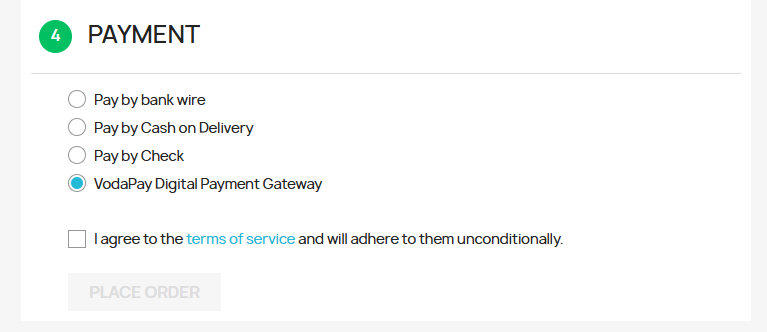
Once all the installation steps have been followed, VodaPay Gateway should show up as a payment option on checkout.
Refund Journey
The VodaPay Gateway PrestaShop Plugin supports refunds on orders made via the VodaPay Gateway.
Process a Refund
Please ensure that the Environment and API-Key are the same as what the order was processed with before proceeding.
- Open your PrestaShop Store's admin dashboard.
- Navigate to Orders -> Orders.
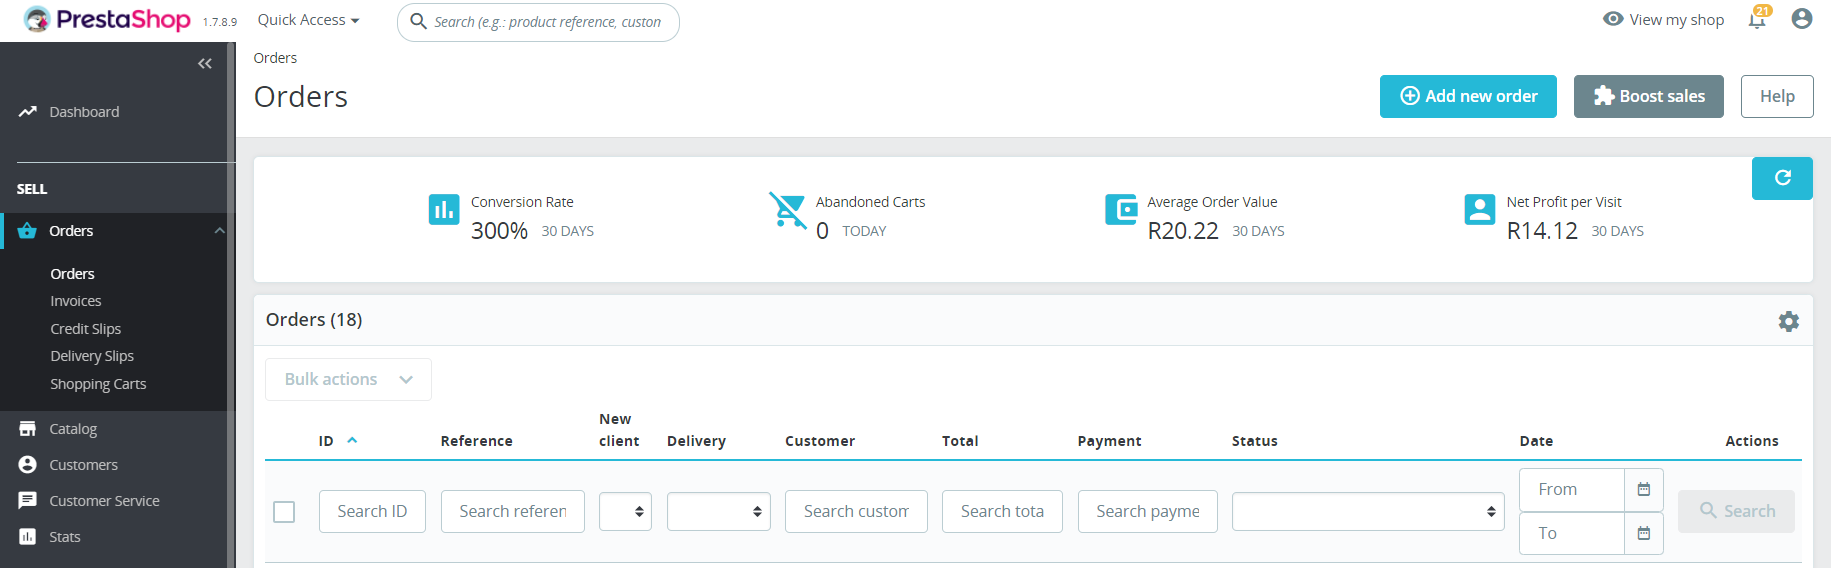
- Click the magnifying glass button labeled "View" of the Order you would like to Refund.

- At the bottom of the page, enter the amount to be refunded and then press the blue "Refund" button.
PLEASE NOTE: The amount entered must be a numeric value above 0 and must not exceed the Amount Paid in Rand.
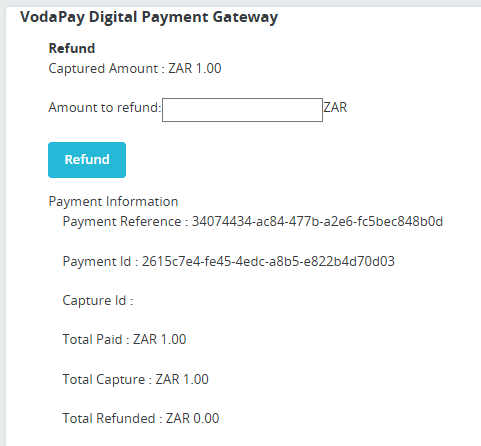
- Finally an alert message will be shown to notify the outcome of the refund.

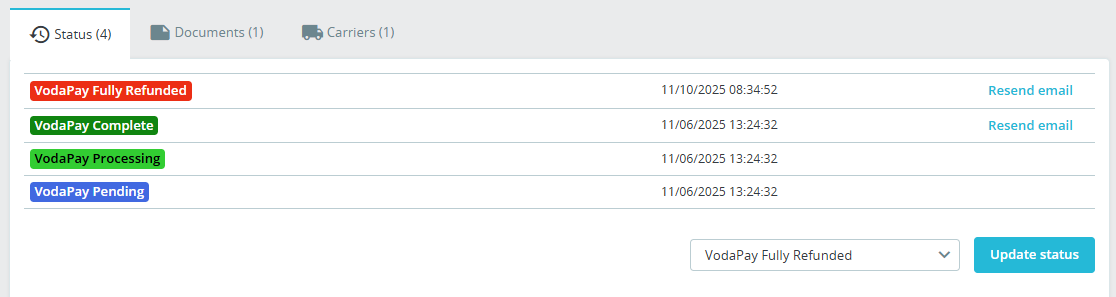
Successful Refund
If the refund was successful, the status of the order will be changed to Refunded.
Shopify
Overview
Shopify is a flexible and scalable commerce platform that lets you create uniquely personalized B2B and B2C experiences, no matter how many brands you have.
What is the VodaPay Shopify plugin?
The VodaPay extension (plugin) integrates with Shopify to provide a secure payment solution, that accepts credit and debit cards payments. The VodaPay Shopify plugin is powered by the VodaPay Gateway to provide a simple and easy-to-implement eCommerce solution for your web-site.
Installation
Installation
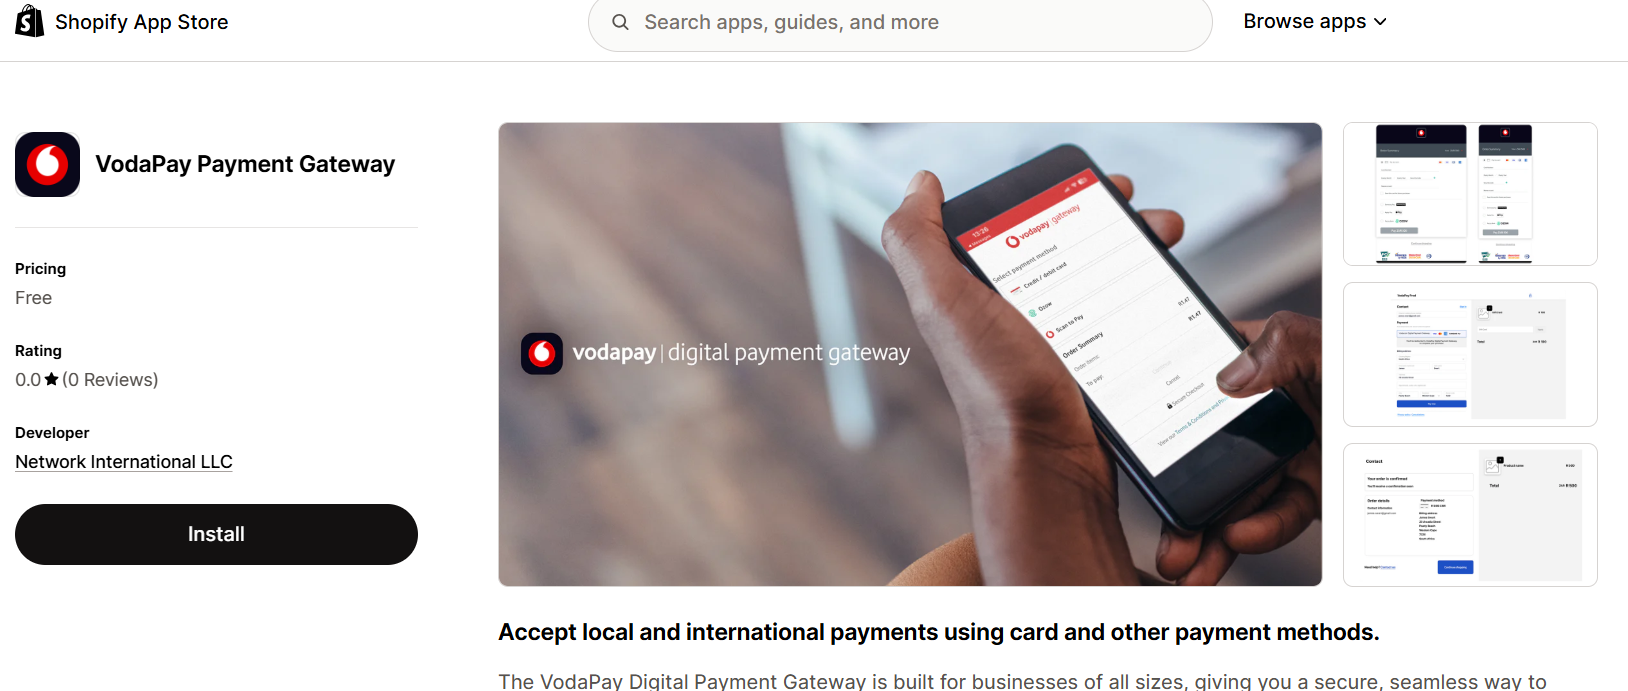
- Click here to go to the VodaPay App page or search in the admin panel under payments > Payment Methods.
-
Once the page has loaded, if you’re logged in, you will see an Install button. If not, you will be required to login to your store.
-
Once you’ve logged in, the below page will be displayed. Click Install.
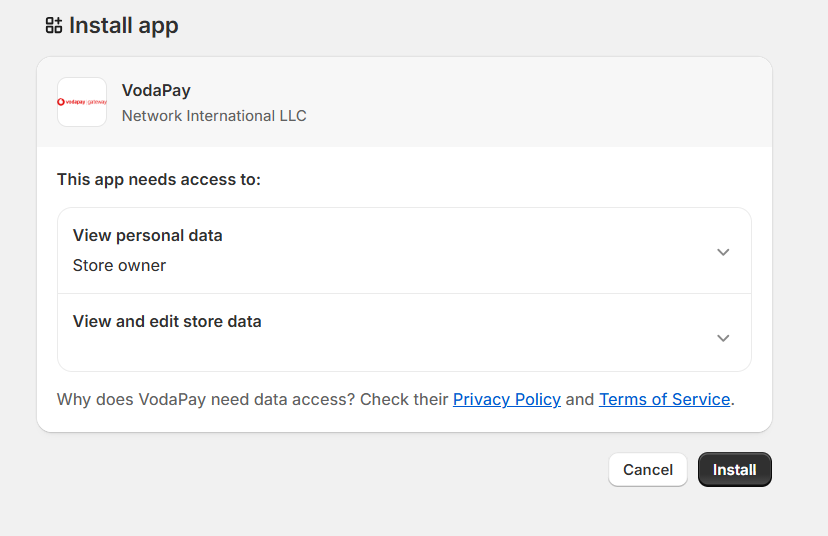
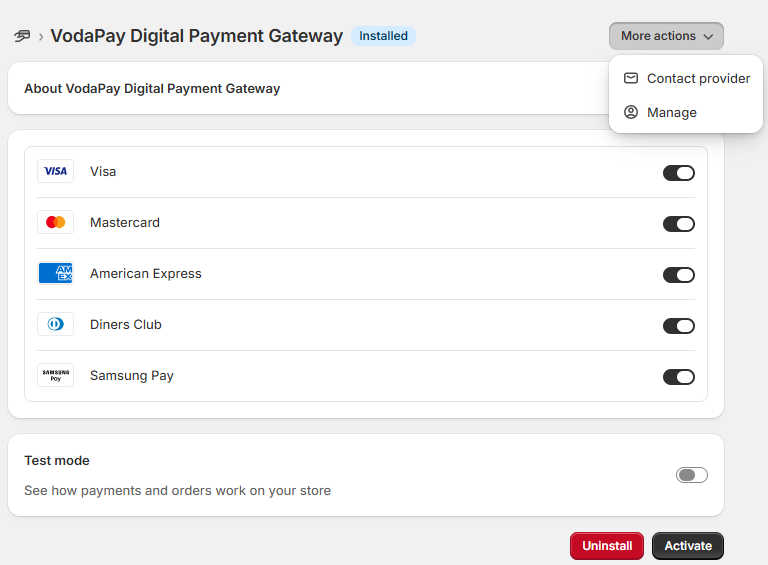
- Once the VodaPay APP is installed, you will be redirected to the APP page. Click Activate.
Configuring the plugin
- Now that the APP is activated, click on More Actions and select Manage.
- You will now be able to configure the plugin with your Integration details.
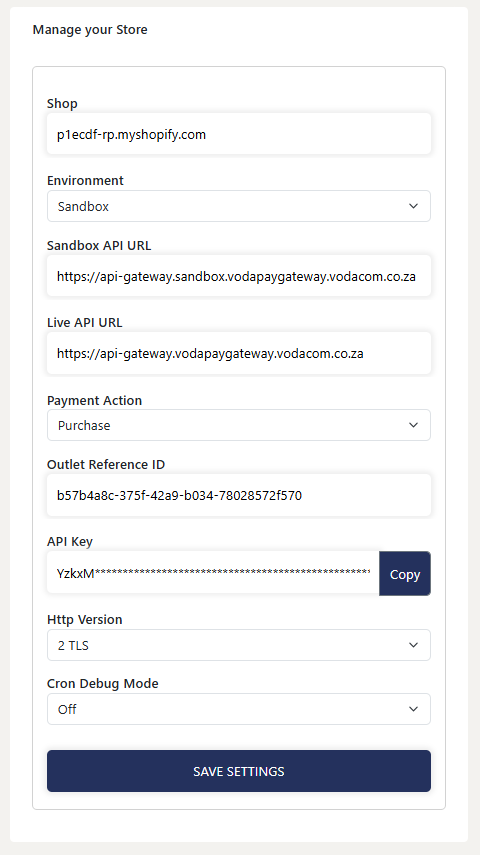
| Field | Description |
|---|---|
| Shop | This will be your store name |
| Environment | Select environment (Sandbox or Live) |
| Sandbox API URL | Enter Sandbox API URL https://api-gateway.sandbox.vodapaygateway.vodacom.co.za |
| Live API URL | Enter Live API URL https://api-gateway.vodapaygateway.vodacom.co.za |
| Payment Action | Select the Payment Action Purchase |
| Outlet Reference | Enter Outlet Reference found in Merchant Portal under the My Profile - eCommerce tab |
| API Key | Enter the Plugin Key found in Merchant Portal under the My Profile - eCommerce tab. This is different from the Payment Gateway API Key used for eCommerce API integration |
| Http Version | Select the Http version 2 TLS |
| Cron Debug Mode | Leave the Cron Debug Mode option off, unless instructed to turn it on by the VodaPay Integration team |
Once-Off Journey
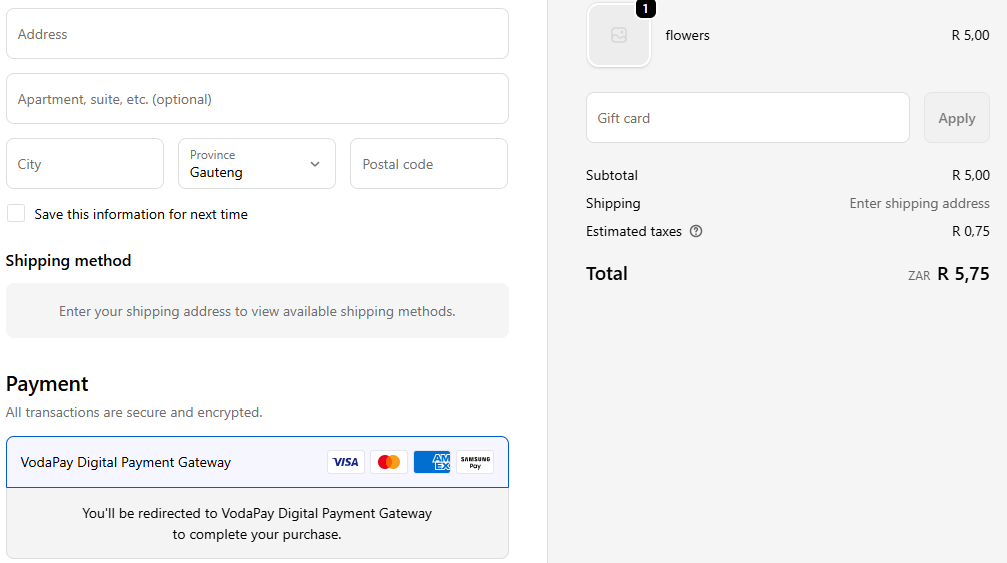
Once all the installation steps have been followed, VodaPay Digital Payment Gateway should show up as a payment option on checkout.
Refund Journey
The VodaPay Gateway Shopify Plugin supports refunds on orders made via the VodaPay Gateway.
Process a Refund
Please ensure that the Environment and API-Key are the same as what the order was processed with before proceeding.
- Open your Shopify Store's admin dashboard.
- Navigate to Orders -> Orders.
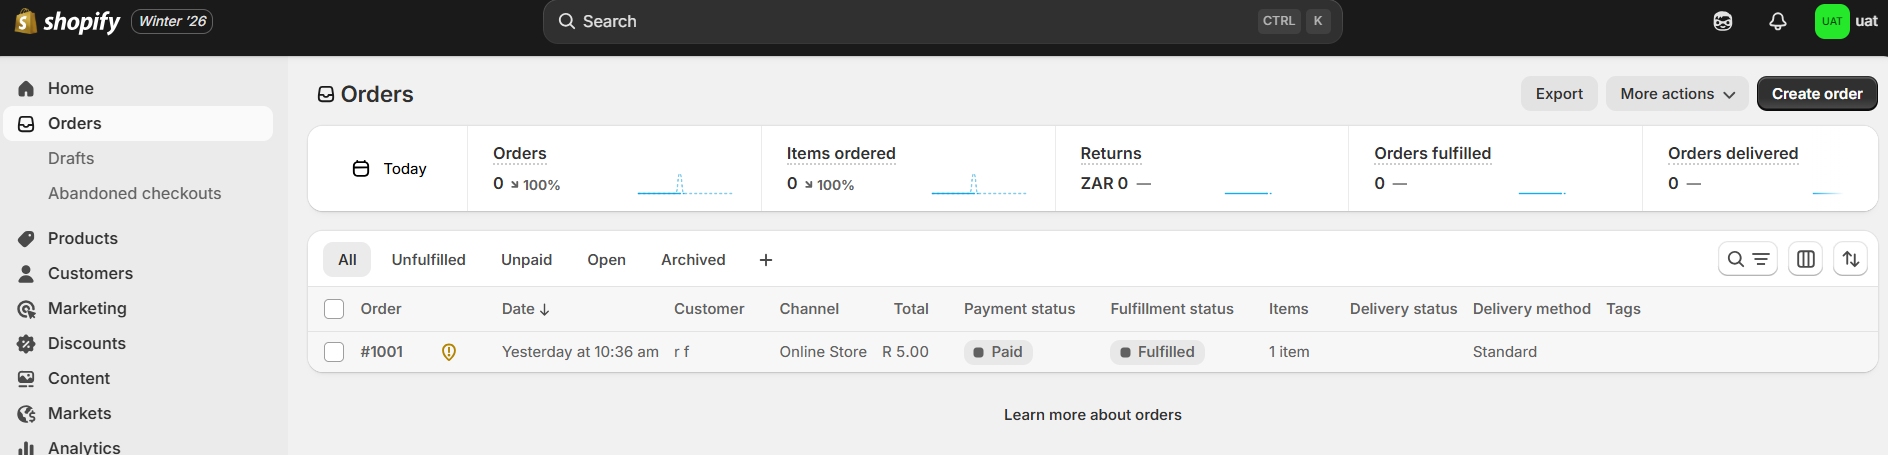
- Click the Order you would like to Refund.
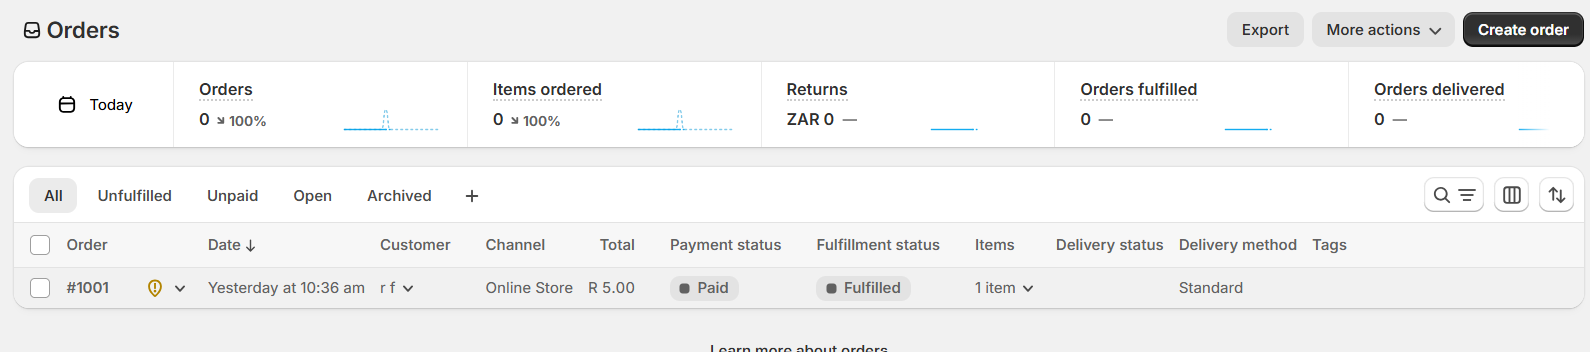
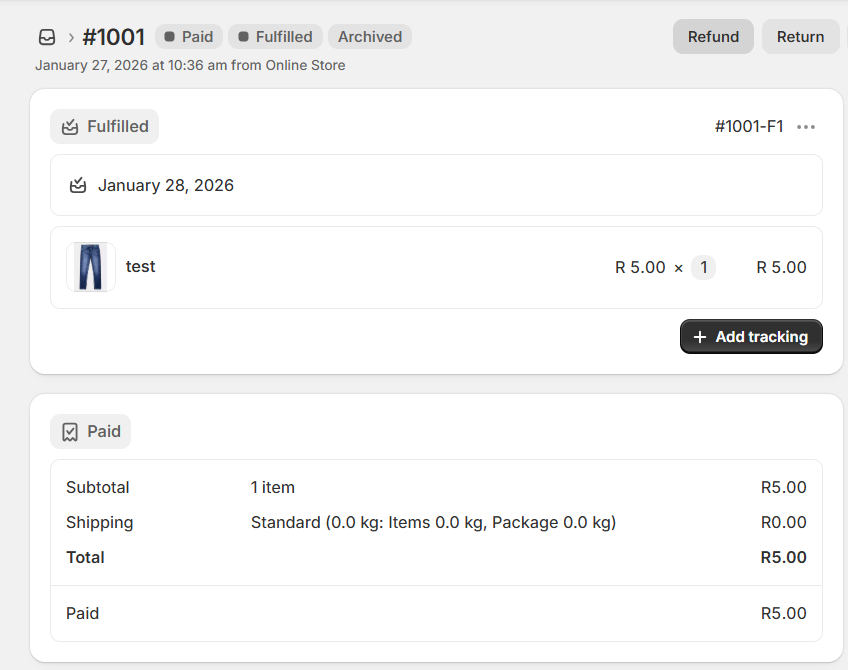
- Press the Refund button at the top of the page.
- Enter the quantity to be refunded and then press the refund button.
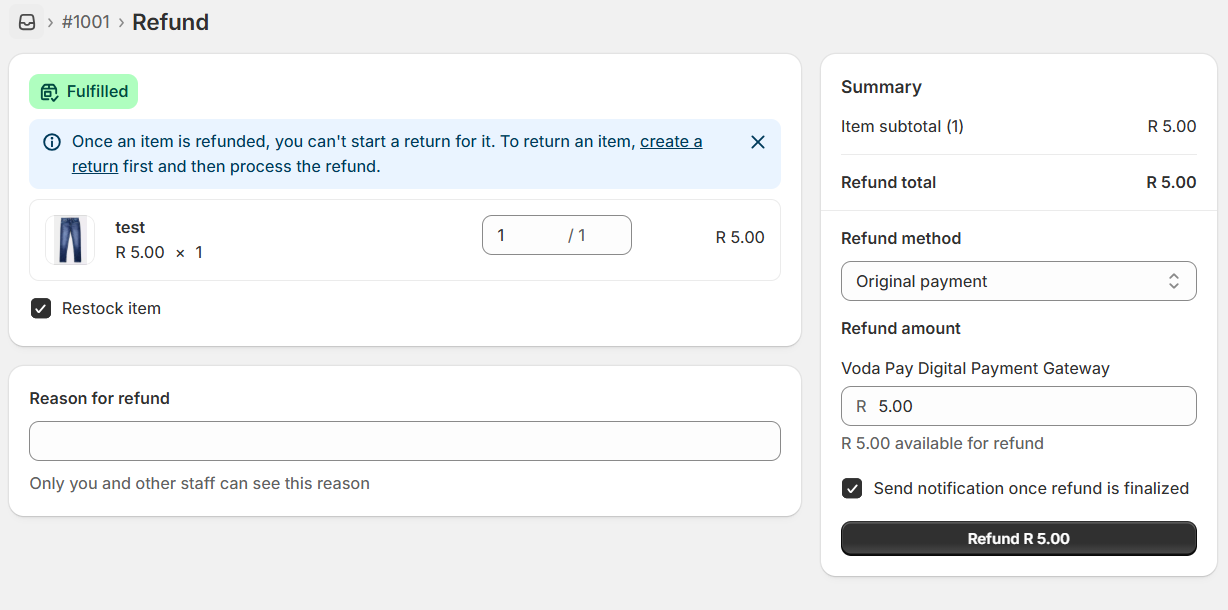
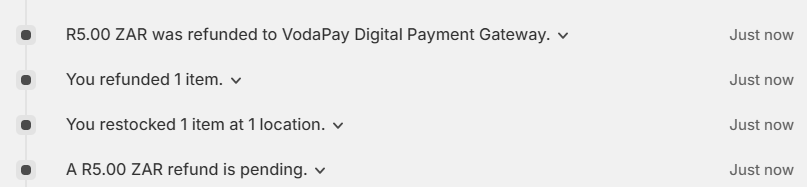
- Finally a message will be shown to display the outcome of the refund.
Successful Refund
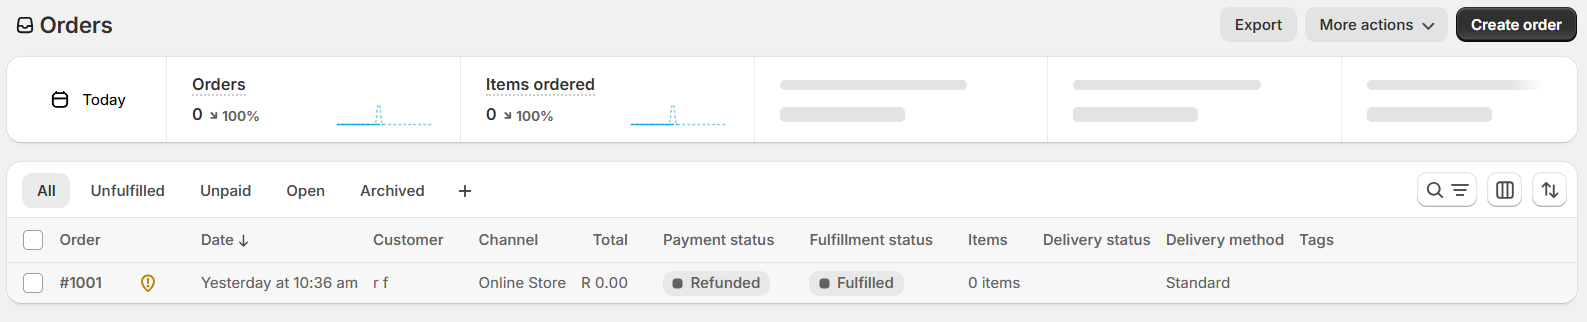
If the refund was successful, the status of the order will be changed to Refunded.
Shopstar
Overview
Shopstar is an e-commerce platform that enables businesses and individuals to create and manage online stores. It provides a variety of tools for building and customizing websites to sell products, manage inventory, process payments, and handle shipping. The platform is designed to be user-friendly and is often used by small to medium-sized businesses.
What is the Shopstar plugin?
The VodaPay extension (plugin) integrates with ShopStar to provide a secure payment solution, that accepts credit and debit cards payments. The VodaPay payments solution gives you a market-leading, simple, evolving and secure platform VodaPay supports a broad and expanding range of payment options and can add new payment types rapidly, keeping you at the forefront of payment acceptance and customer demands. Our easy-to-use customer portal lets you keep close tabs on your business and manage it like a pro.
- Trusted standards in payment processing.
- Secure and proud fraud monitoring and data security is always a top priority.
- Access to multiple payment methods with one integration.
How do I add the Shopstar plugin?
Configure the plugin on your ShopStar site.
Installation
Installation
-
Navigate to ShopStar admin dashboard
-
Click on Settings > Payment Methods, then select VodaPay Digital Payment Gateway. Configure all required details (e.g. outlet reference, API key), and save the configuration.
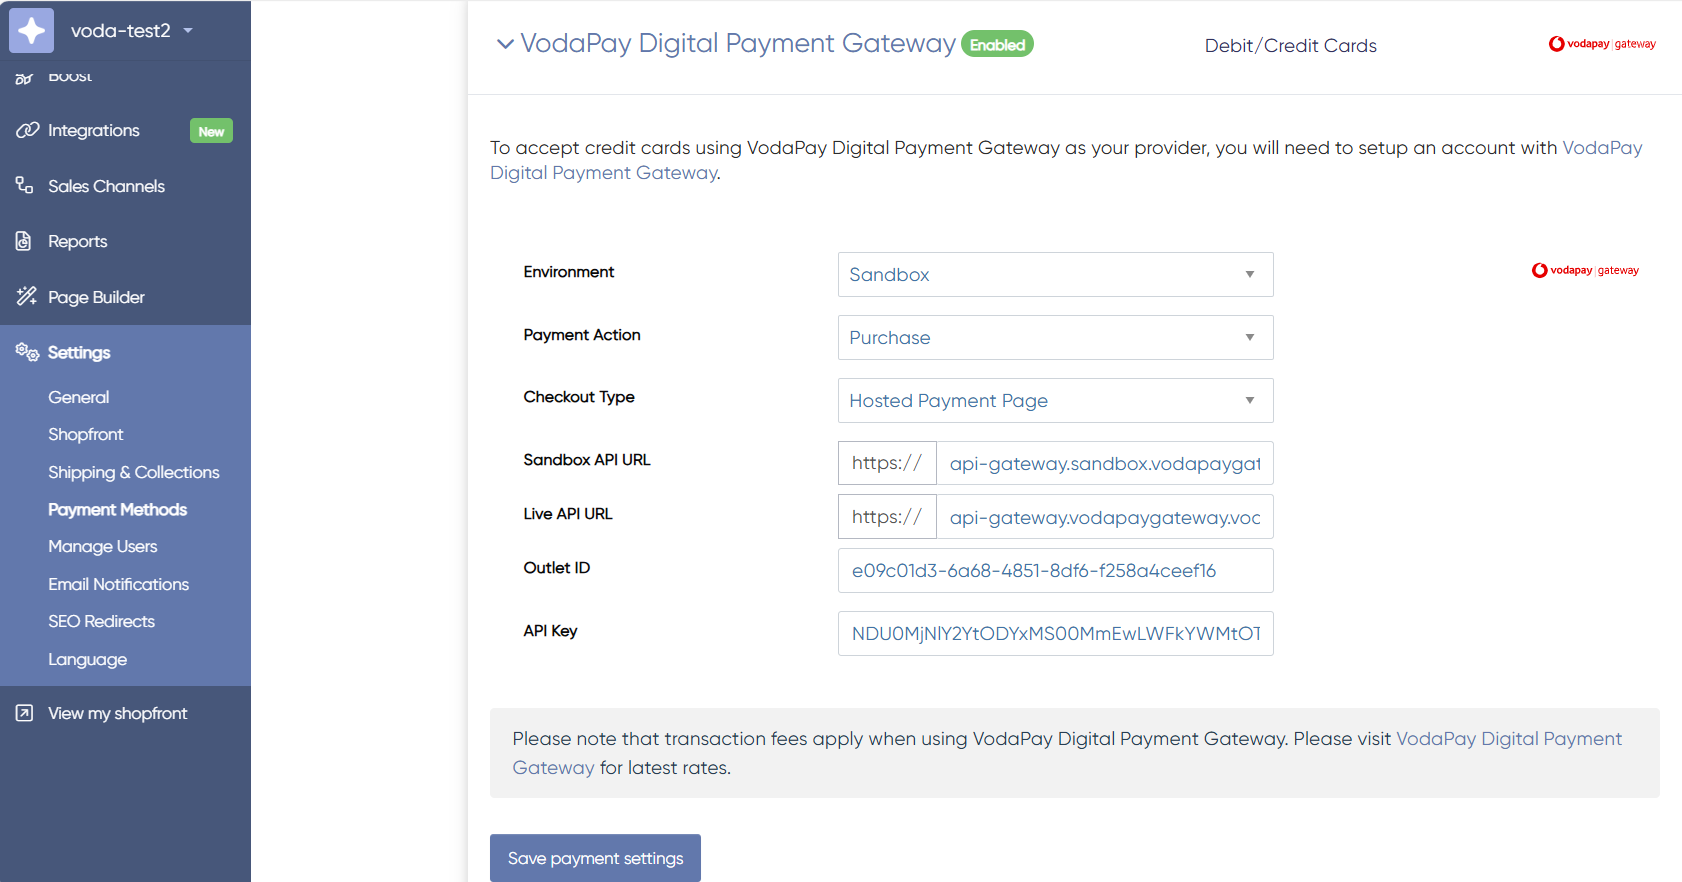
| Field | Description |
|---|---|
| Environment | Select environment (Sandbox or Live) |
| Payment Action | Select the Payment Action Purchase |
| Checkout Type | Select the Checkout Type Hosted Payment Page |
| Sandbox API URL | Enter Sandbox API URL https://api-gateway.sandbox.vodapaygateway.vodacom.co.za |
| Live API URL | Enter Live API URL https://api-gateway.vodapaygateway.vodacom.co.za |
| Outlet ID | Enter Outlet ID found in Portal. |
| API Key | Enter the Plugin Key provided by Portal. This is different from the Payment Gateway API Key used for eCommerce API integration |
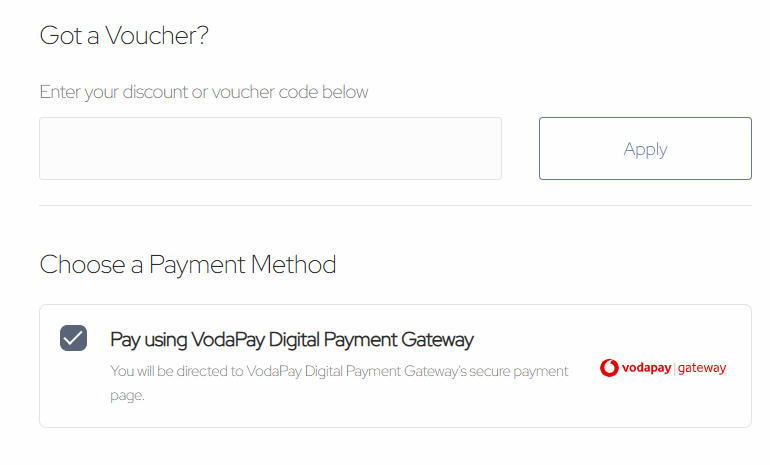
Once-Off Journey
Once all the installation steps have been followed, VodaPay Digital Payment Gateway should show up as a payment option on checkout.
WooCommerce
Overview
WooCommerce is a flexible, open-source commerce solution built on WordPress. The company started in 2008 as WooThemes and in 2017 decided to focus exclusively on ecommerce.
What is the VodaPay WooCommerce plugin?
WooCommerce is a customizable, open-source eCommerce platform built on WordPress. The VodaPay extension (plugin) integrates with WooCommerce to provide a secure payment solution, that accepts credit and debit cards, EFT payments, and QR code payments. The VodaPay WooCommerce plugin is powered by the VodaPay Gateway to provide a simple and easy-to-implement eCommerce solution for your web-site.
VodaPay Plugin Download
The latest VodaPay Digital Payment Gateway for WooCommerce plugin must first be downloaded from the GitLab Releases resource site here. Download the latest ZIP file locally to your Wordpress server by selecting the latest file from Gitlab and specifying a local destination.

Installation
Installation
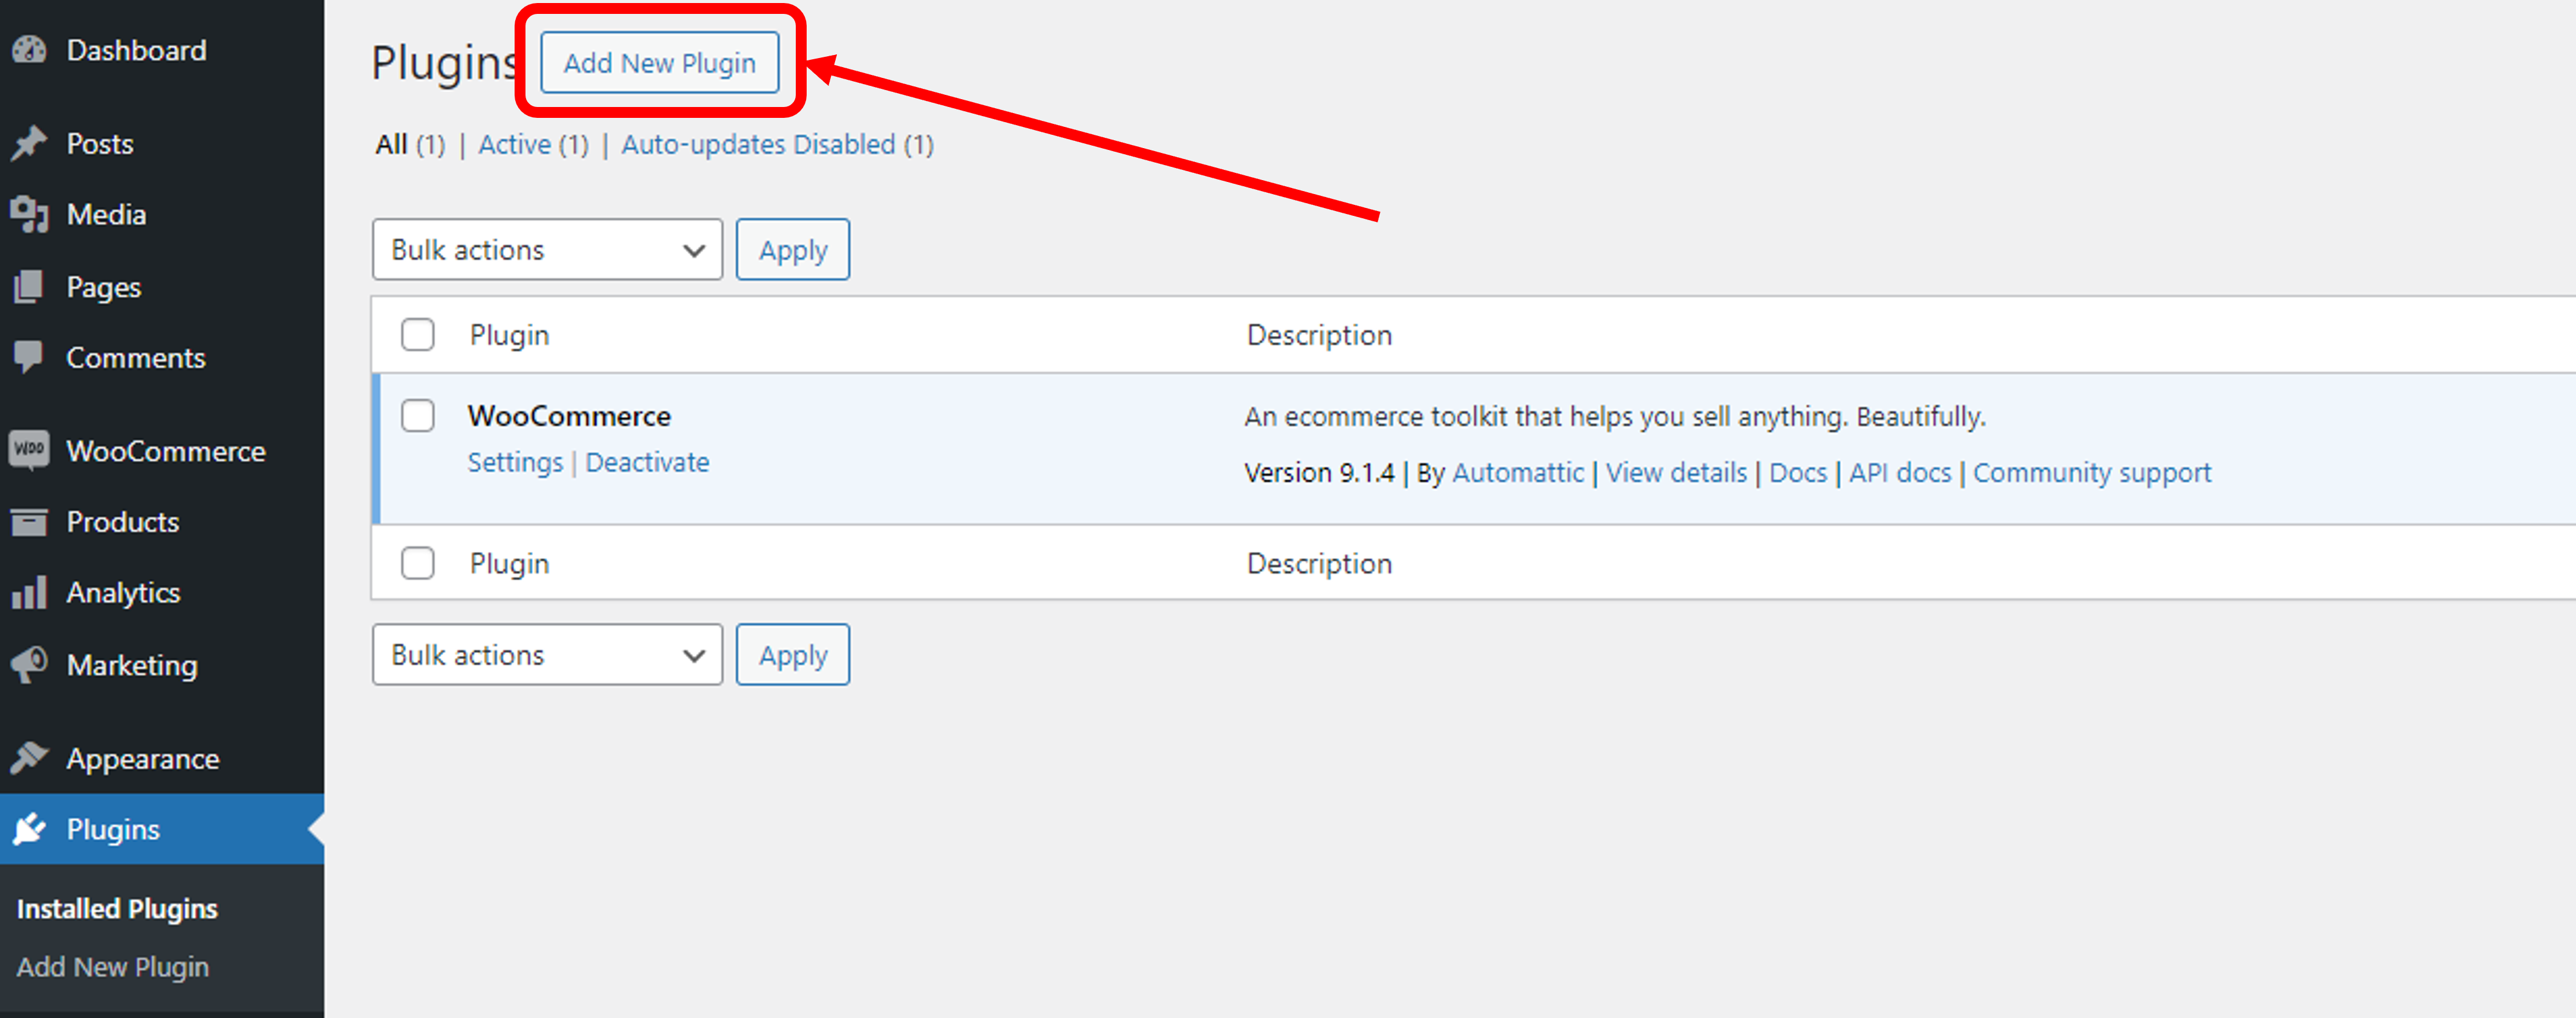
- Select the Plugins Menu.
- Click the blue Add New Plugin button.
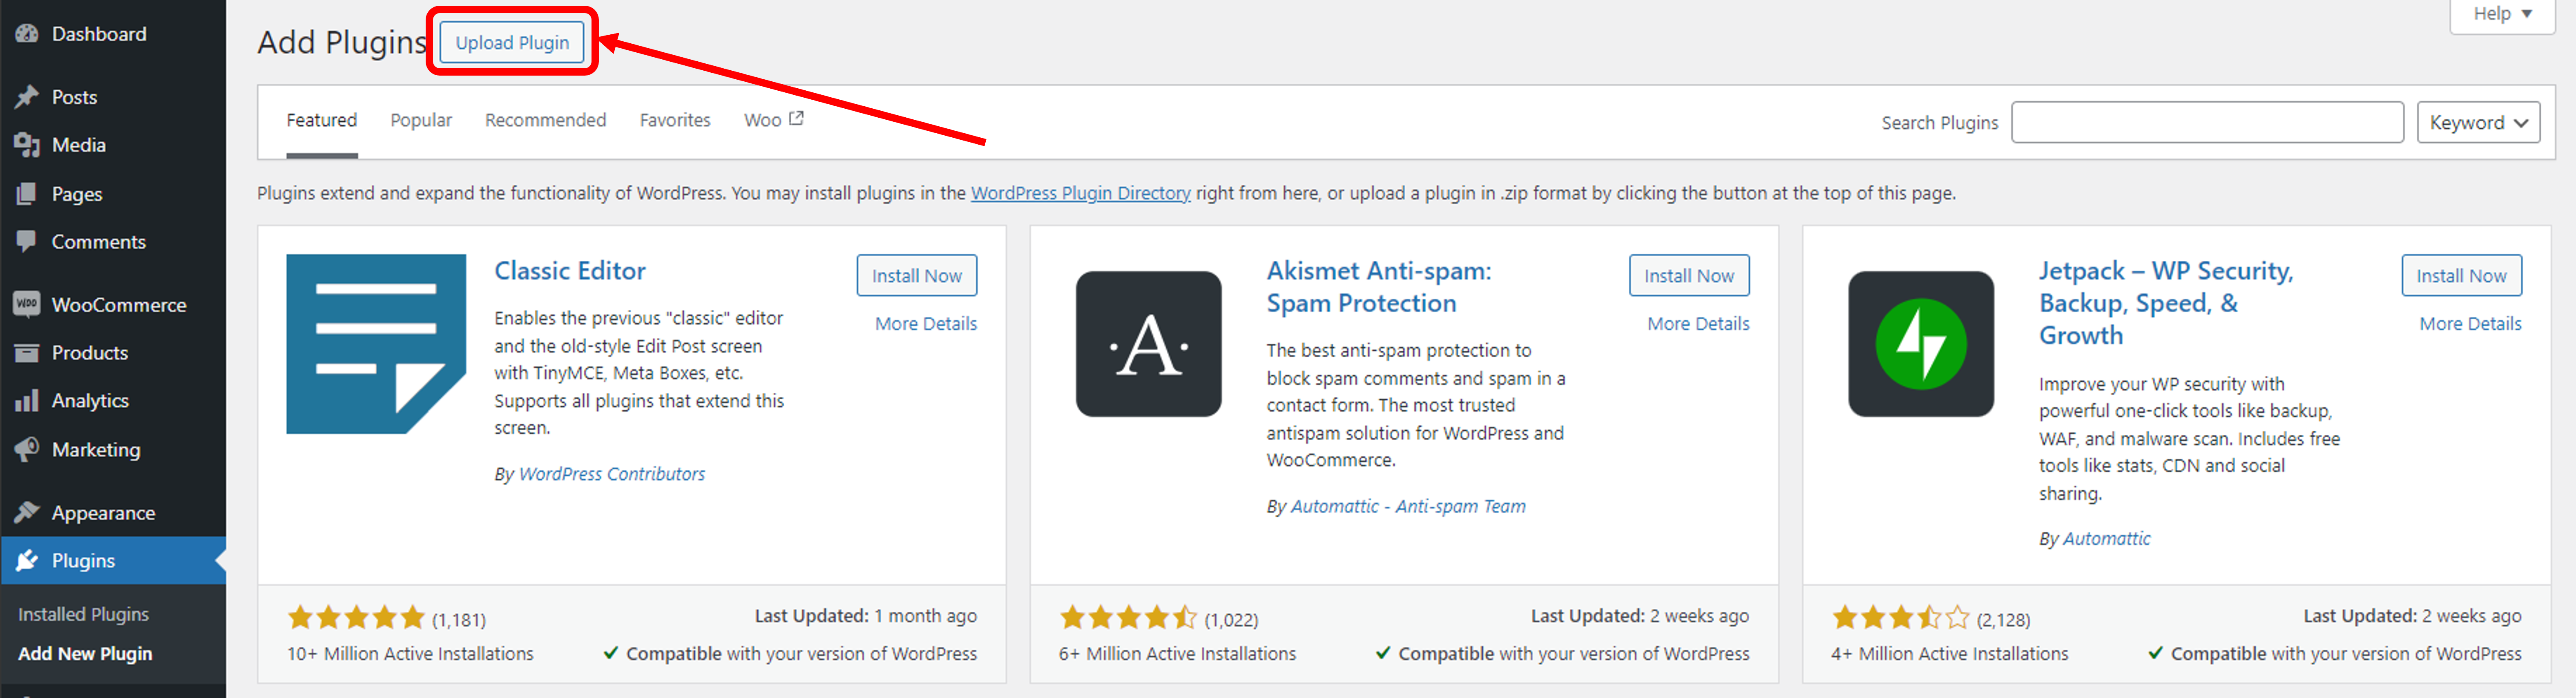
- Click the blue Upload Plugin button.
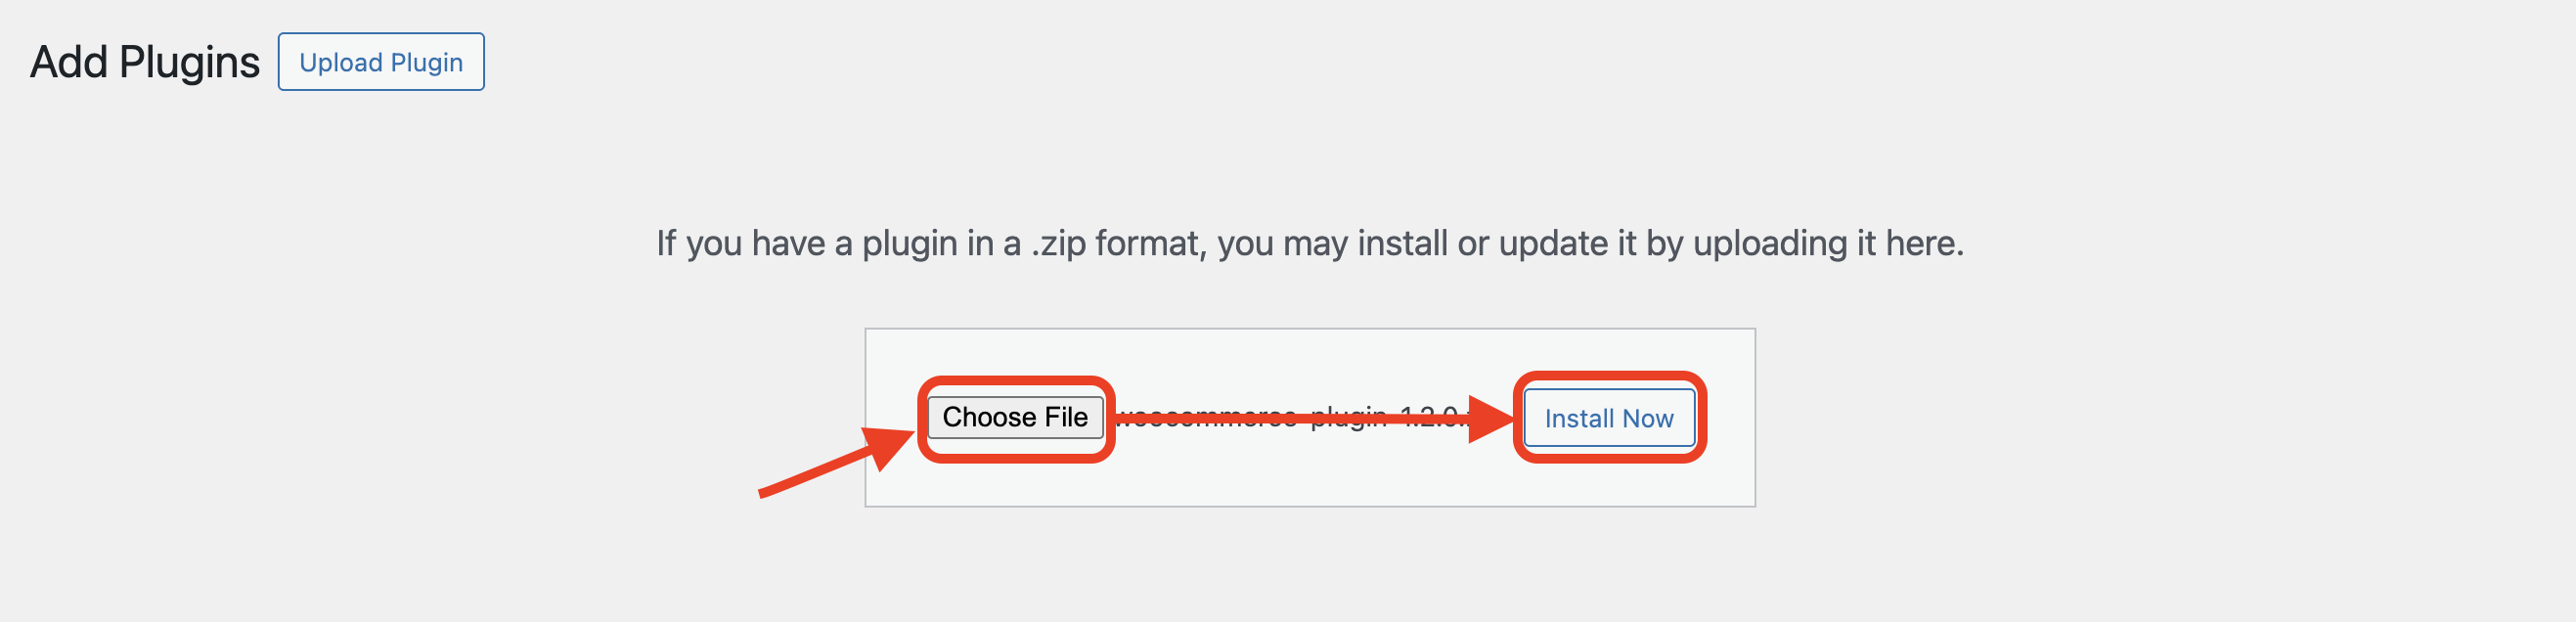
- Click Choose File, select woocommerce-plugin.zip, and click Install Now.
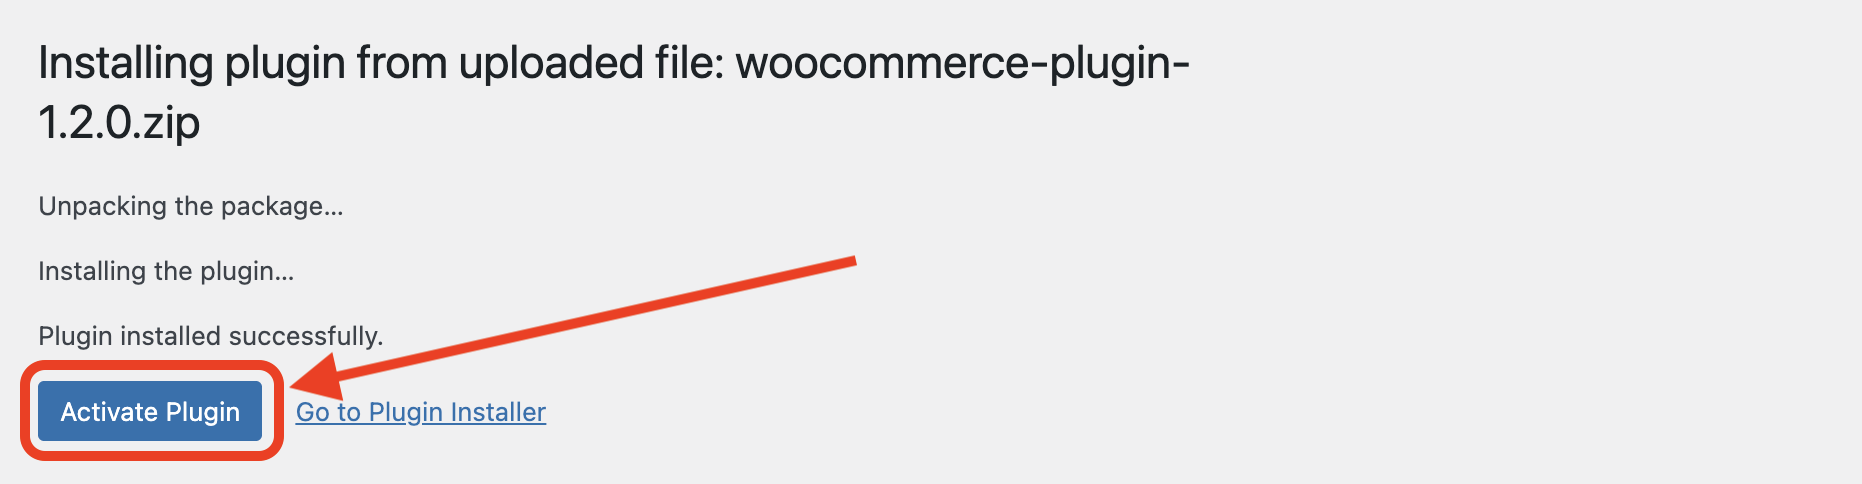
- Once installation is complete, click Activate Plugin.
Configuring the plugin
- Select the Plugins Menu.
- Find VodaPay Digital Payment Gateway in the list and ensure it is Activated. Select Settings.

- You should now see the settings that are configurable for the WooCommerce plugin.
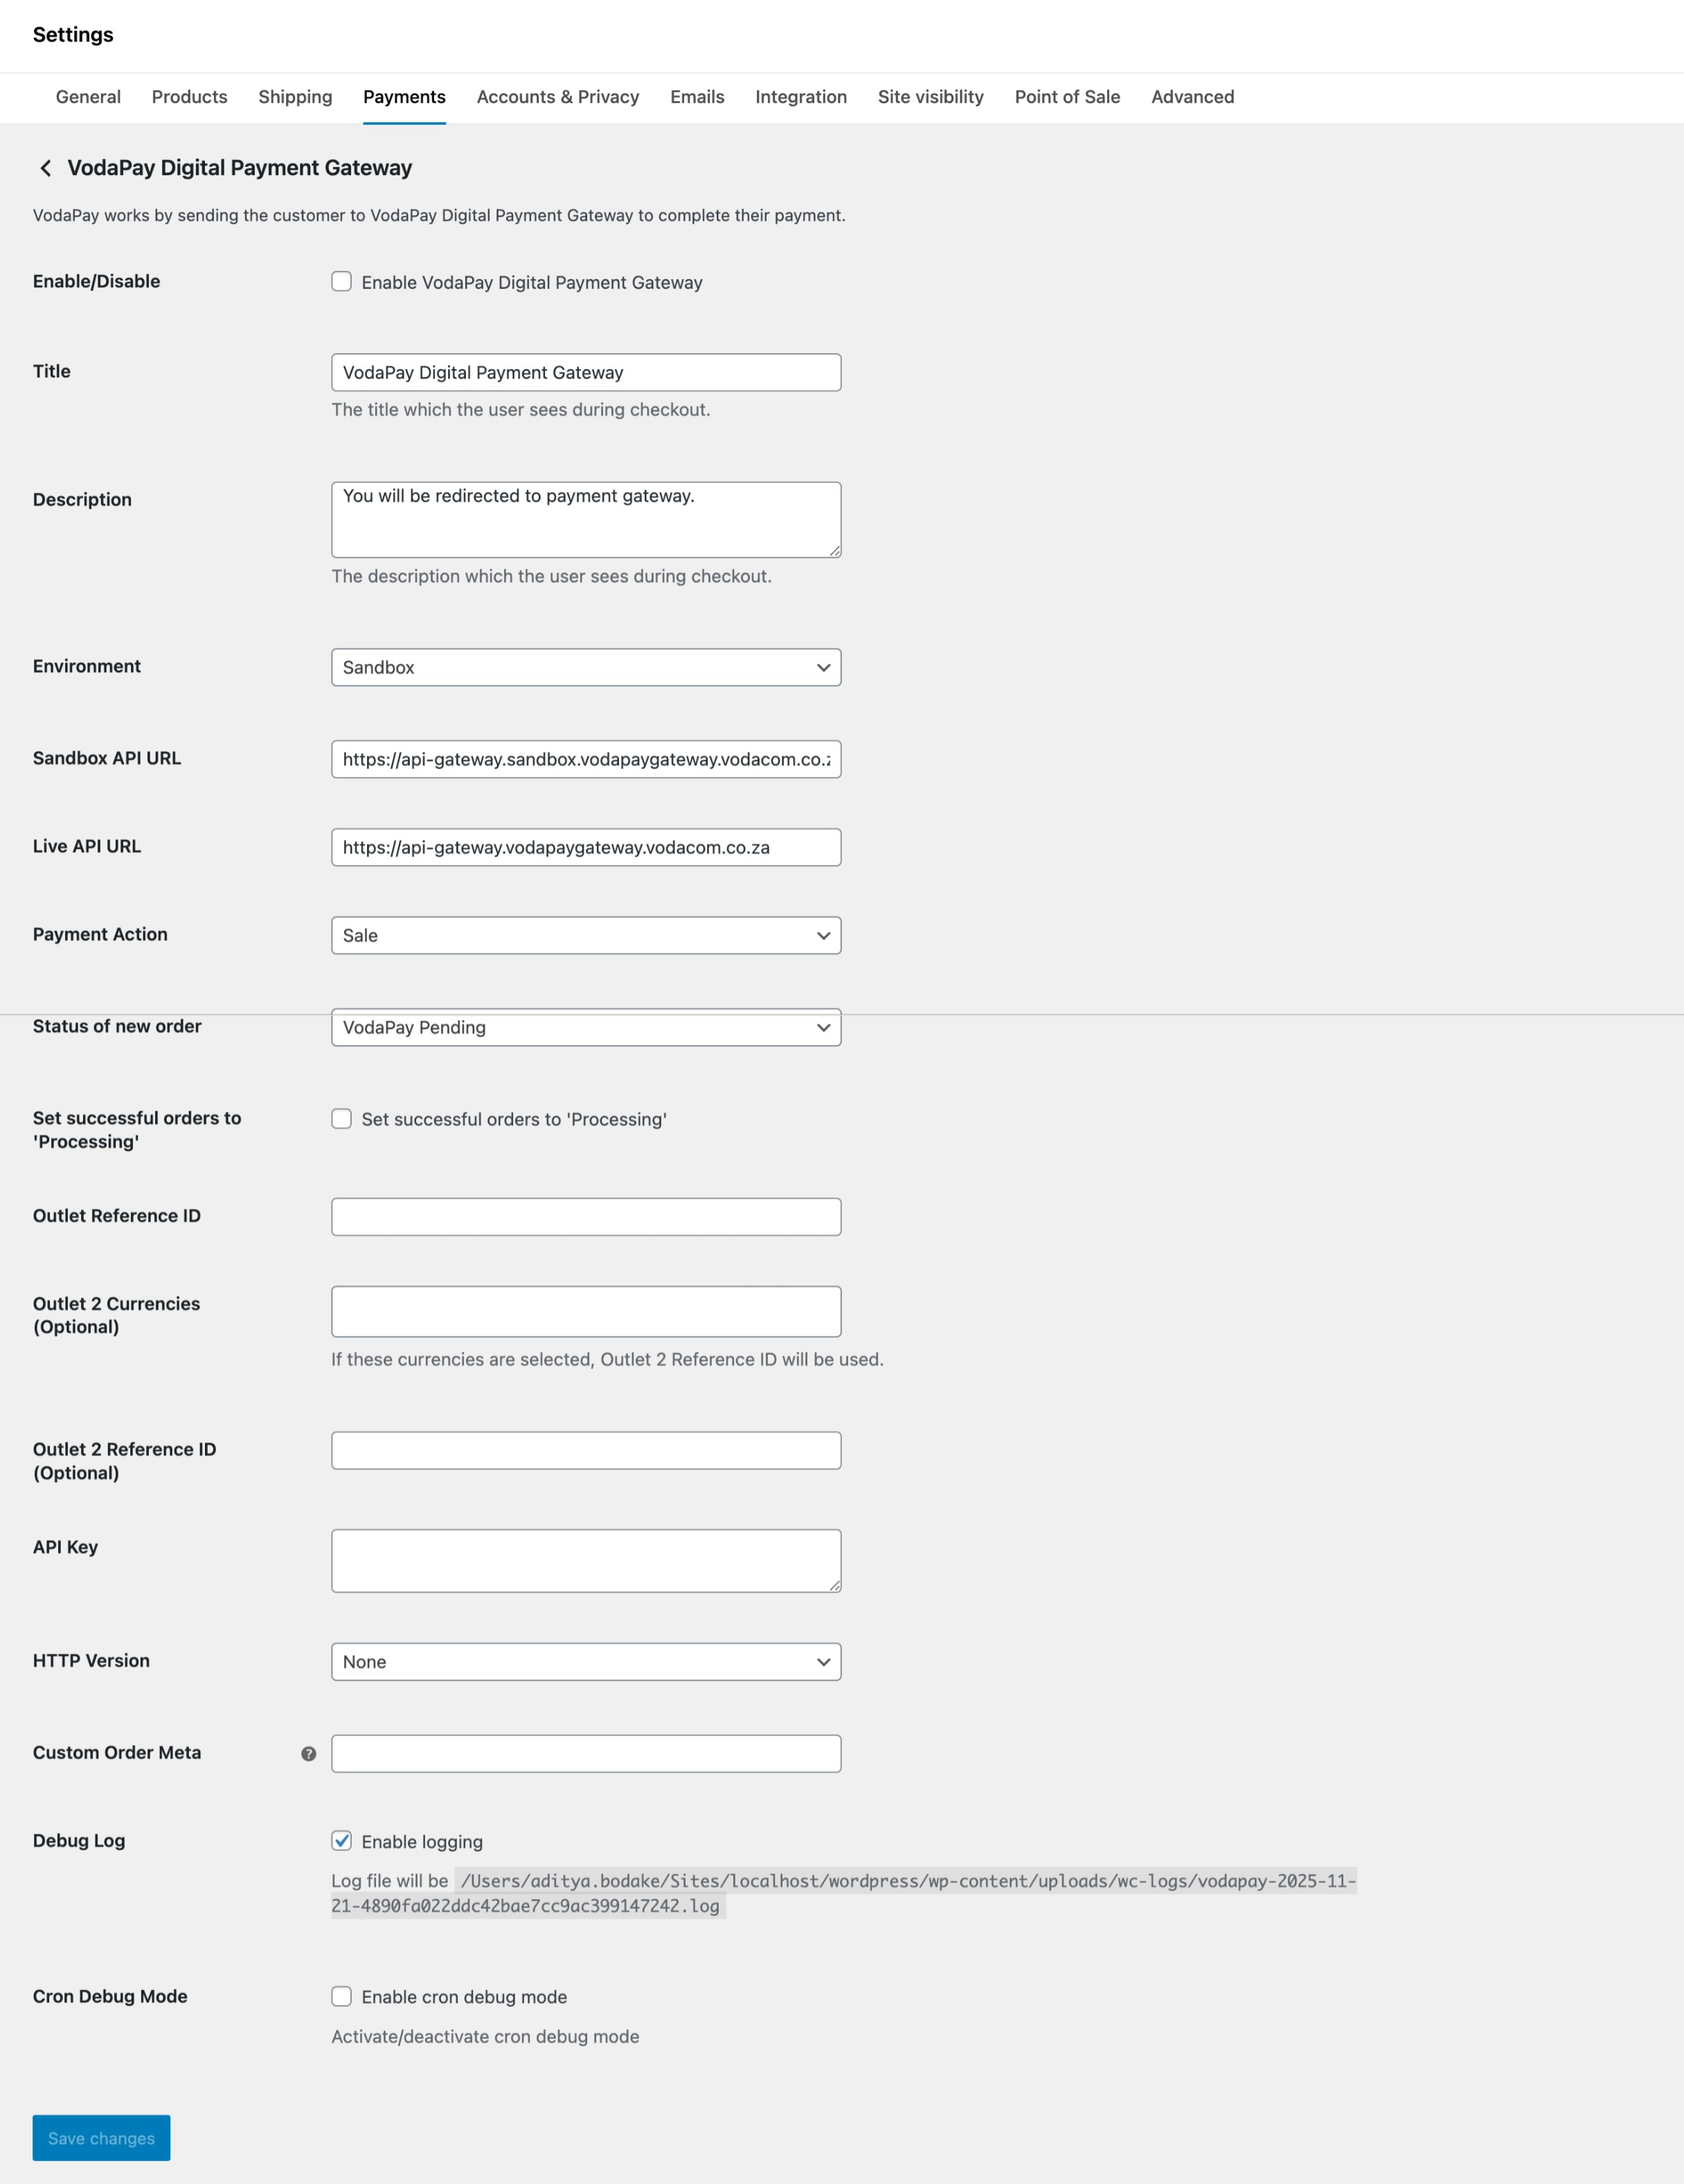
To correctly configure and capture the VodaPay WooCommerce plugin, please follow parameters in point 3 above.
| Field | Description |
|---|---|
| Enable/Disable | Enable the VodaPay Digital Payment Gateway to have VodaPay as a payment option on your payment check-out page |
| Environment | Select environment Sandbox or Live |
| Sandbox API URL | Enter Sandbox API URL https://api-gateway.sandbox.vodapaygateway.vodacom.co.za |
| Live API URL | Enter Live API URL https://api-gateway.vodapaygateway.vodacom.co.za |
| Payment Action | Select the Payment Action as Purchase, Sale |
| Status of new order | Select the status of new orders after payment is processed |
| Set successful orders to 'Processing' | Check this box if you want successful orders to be set to 'Processing' status automatically |
| Outlet Reference | Enter Outlet Reference found in Merchant Portal under the My Profile - eCommerce tab |
| API Key | Enter the Plugin Key found in Merchant Portal under the My Profile - eCommerce tab. This is different from the Payment Gateway API Key used for eCommerce API integration |
| Http Version | Select the Http version 2 TLS |
| Debug | Debug mode allows the plugin to record all logs in the case of an investigation into a bug. It can greatly impact the loading speed of the pages of the store so it is recommended that it be left off until necessary |
| Cron Debug Mode | Leave the Cron Debug Mode option off, unless instructed to turn it on by the VodaPay Integration team |
Once-Off Journey
Once all the installation steps have been followed, VodaPay Gateway should show up as a payment option on checkout.